Thursday, March 30, 2017
how to reset waste ink counter canon pixma ix5000 and ix4000
how to reset waste ink counter canon pixma ix5000 and ix4000
- Connect the Canon PIXMA iX5000 or iX4000 printer to the power cord. ( note : If the automatic power-on function is enabled in the printer, the printer enters the service mode for the first time, but it will never enter the service mode if the printer is turned off by the Power button. This is because the printer remains to be turned on internally if the power is turned off by the Power button. To prevent this, disconnection of the power cord is required before starting the printer in the service mode ) .
- With the Canon PIXMA iX5000 or iX4000 printer powered off, while pressing the Resume/Cancel button, press and hold the Power button. (note : Don’t release the buttons. The Power LED lights in green to indicate that a function is selectable.)
- While holding the Power button, release Resume/Cancel button. (Don’t release the Power button.)
- While holding the Power button, press Resume/Cancel button 2 times, and then release both the Power and Resume/Cancel buttons.
- When the Power LED lights in green, press the Resume/Cancel button 4 times to reset waste ink counter in the Canon Pixma iX5000 / iX4000. (note : If the Power LED does not light in green the printer does not enter the service mode, disconnect the power cord and plug it again. Then start from step 1 to start the printer in the service mode again).
- At the end of the service mode, press the Power button. The paper lifting plate of the sheet feed unit will be raised.
- Note :
- Each time the Resume/Cancel button is pressed, the Alarm and Power LEDs light alternately, Alarm in orange and Power in green, starting with Alarm LED.
- Other specified number of time(s) according to the function listed in the table below :
| Time(s) | LED indication | Function Remarks |
| 0 times | Green (Power) | Power off |
| 1 time | Orange (Alarm) | Service test print |
| 2 times | Green (Power) | EEPROM information print |
| 3 times | Orange (Alarm) | EEPROM initialization |
| 4 times | Green (Power) | Waste ink counter resetting |
| 5 times | Orange (Alarm) | Destination settings |
| 6 times | Green (Power) | Print head deep cleaning (Cleaning of both black and color) |
Available link for download
Monday, March 27, 2017
How to Reset Canon Pixma MP110 and MP130
How to Reset Canon Pixma MP110 and MP130
How to Reset Canon Pixma MP110 and MP130
Try this methode to reset Canon Pixma MP110 and MP130 printers
Resetting overflow error code for Printer Canon Pixma MP110 :
- Turn on the printer.
- Click Menu, and then Scan, Copy and Scan again. All – entered the service mode.
- Select Counter
- Click Copy – everything. Waste dropped to zero.
- Turn off the printer POWER button.
Reset Canon Pixma MP130 Printer
- Turn on the printer.
- Press the MENU key, and then SCAN, COPY and SCAN again – entered the service mode.
- Select NVRAM ACCESS further OK.
- Select SET ABS-M LEVEL and set value equal to zero.
- Select SET ABS-R LEVEL (if any) and is set to zero.
- Turn off the printer POWER button.
Available link for download
Friday, March 24, 2017
How to Fix Error Code E13 and 1686 in Canon MX Series Printers
How to Fix Error Code E13 and 1686 in Canon MX Series Printers
Canon recommends using new genuine Canon cartridges in order to obtain optimum qualities.
Please view the compatible ink cartridges for your machine using our PIXMA ink finder.
NOTE - Since the information contained in the fax may be lost if it is printed in this condition, the received fax will not be printed and will be stored in the machines memory until the ink cartridge is replaced. You must manually print out faxes that were stored in the memory. You can change the setting so that the received fax is forcibly printed out instead of being stored in the memory, but all or part of the fax information may not be printed because of the ink out condition.
Available link for download
Tuesday, March 21, 2017
How to Manual Reset Printers Canon Pixma iP4200 iP5200 iP6000 and iP8500
How to Manual Reset Printers Canon Pixma iP4200 iP5200 iP6000 and iP8500
Canon Pixma iP4200, iP5200, iP6000, iP8500 Reset Procedure
- Turn off the Printers.
- Hold Resume button click POWER.
- Hold button RESUME, release POWER
- Then press the button again twice RESUME.
- Release all the buttons.
- Indicator led in green and stay green.
- Click the button 4 times RESUME, if you want to make another transaction. :
1 led- Orange – Service test print 1 times – Orange – Service test print
2 led – Green – EEPROM information print 2 times – Green – EEPROM information print
3 led – Orange – EEPROM initialization 3 times – Orange – EEPROM initialization
4 led – Green – Waste ink counter setting 4 time – Green – Waste ink counter setting
5 led – Orange – Destination setting (Press Power > Press Resume 3x) 5 times – Orange –
Destination setting (Press Power> Press Resume 3x)
6 led – Green – Print head deep cleaning 6 times – Green – Print head deep cleaning
11-13 led – Orange, Green, Orange – Return to menu selection
14 led – Green – Left margin correction 14 times – Green – Left margin correction
- Turn off the printer POWER button.
Available link for download
Saturday, March 11, 2017
How to Overcome Print results striped and the ink does not come out
How to Overcome Print results striped and the ink does not come out
How to cope with a striped print results, or even worse, the ink can not get out. This condition often occurs due to a lack of attention to the printer head. Negligence in caring for and maintaining the printer Inkjet printers in particular can cause damage to the printer head is a temporary or permanent basis.

Available link for download
How to Disabling Low Ink Level Notification for Canon IP and MP
How to Disabling Low Ink Level Notification for Canon IP and MP
 The reset method work for canon printers that using PG-40 and CL-41 cartridge. After doing this reset method canon printer will not display low ink notification anymore and will not show error code ”E4? or ”E5?. This method takes from indoreset yahoo group and prepared by Choy.
Here How to Disabling Low Ink Level Notification for Canon IP and MP, the method to reset ink level notification :
- Push ”resume“ for 5 seconds for canon IPXXXX. For canon MPXXX you must enter to service mode.
- Push Power switch then remove power cord.
- Insert plug power cord while pressing ”power switch“ at the same time.
- Push Start/reset by step 2 continue Wait display shown ”0?
- Push + change display from ”0? to ”1?
- Push color button 2 times
- Push Power switch again , Printer will print 1 page
- Open cover
- Unplug power cord
- Take out ink cartridge #40 and #41
- Insert plug again
- Push power switch
- Open cover (scan cover)
- Insert ink cartridge #40 and #41 again
Enter to service mode for canon MPXXX
- With the printer powered off but connected to a power source, press the Power button while pressing and holding the Reset button.
- When the Power is lit, press the Reset button two times while pressing and holding the Power button.
- When releasing the Power button and the Reset button (regardless of order), the printer will move into a service mode. (Waiting for menu selection)
Available link for download
Friday, March 10, 2017
How to Reset Canon Pixma Mp150 Mp160 Mp170 Mp180 Mp450 and Mp460 Using Mptool Software
How to Reset Canon Pixma Mp150 Mp160 Mp170 Mp180 Mp450 and Mp460 Using Mptool Software
Besides service tool, mptool is the popularness software to reset printers canon pixma series like MP150, MP160, MP170, MP180, MP450 and MP460. Excess of software that is the program measure of small and amenity of usage. Ability of the software that is to reset level black and color cartridge at canon pixma mp series. And there also facility to write and read EEPROM in the printer. Other excess this software is detect automatically installing printers in the computer.
Reset Ink Counter.
Reset ink counter that is resetting ink level (ink metrer) cartridge at printer.
Reset waste ink counter
To reset waste ink counter at printers canon pixma MP150, MP160, MP170, MP180, MP450 and MP460 there any 2 choice, that is :
Download MPTool Software support for Canon MP150, MP160, MP170, MP180, MP450, MP460
Available link for download
Sunday, March 5, 2017
ERROR CODE AND RESET CANON MP150 MP160
ERROR CODE AND RESET CANON MP150 MP160

E9 The connected digital camera / video camera does not support Camera
Direct Printing
E14 The Ink cartridges whose destination are wrong
E15 Ink cartridge is not installed E16 - Ink remaining is unknown
E16 -E19 Failed to scan head alignment sheet
E22 Carriage error
E23 Paper feed error
E24 Purge unit error
E25 ASF(cam) sensor error
E26 Internal temperature rise error
E27 Waste ink absorber full or platen waste ink absorber full
E28 Ink cartridge temperature rise error -
E29 EEPROM error
E33 Paper feed position error
E35 15 USB Host VBUD overcurrent error - USB
E37 17 Abnormal motor driver error
E40 20 Other hardware error
E42 22 Scanner error
Available link for download
Tuesday, February 28, 2017
How to Reset Canon ip1980 and IP1880
How to Reset Canon ip1980 and IP1880

When you try to print and a pop-up message appear saying that "The ink absorber is full" it means that the ink absorber or wastepad inside your printer is almost full. In order to solve this you need a technical knowledge on how to disassemble the printer and software resetter.
FIRST STEPS: Entering Service Mode
First you have to enter in service mode state in order to used the resetter. To do that follow this procedure,
1. Unplug the power cable of the printer.
2. Press and hold down the power button with your index finger and then plug-in the power cable.
3. While holding down the power button, press the reset/resume button twice and release the power button
4. You will notice that the Alternate Blinking error is gone, this means that the printer is in Service Mode state.
5. Download Canon IP1980 Resetter Here
Download Canon IP1880 Resetter Here
SECOND STEPS: Using the Software
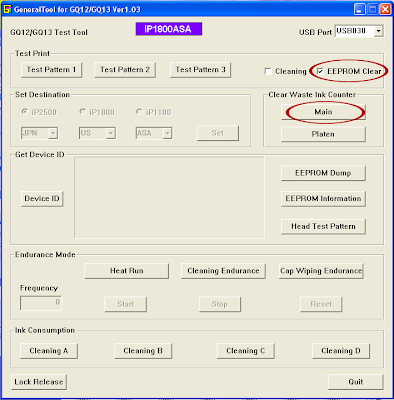
1. After you download the resetter, extract it and double click "GeneralTool"
2. Select or Check the EEPROM CLEAR then click the MAIN button, you will notice that the power button light will blink. It means that the it clear the waste ink counter.
3. Unplug the power cable to turn off the printer
4. Then plug-in again the power cable. then turn ON the printer. And its DONE!
Warning: Getting rid of the error message won’t change that you might end up with ink leaking out of the printer if you don’t either replace or clean them.
Available link for download
Monday, February 27, 2017
Free Download TuneUp Utilities 2014 v14 0 1000 340 Final Full Crack and Key
Free Download TuneUp Utilities 2014 v14 0 1000 340 Final Full Crack and Key
TuneUp Utilities 2014 Key
TuneUp Utilities 2014 Full
Available link for download
Friday, February 17, 2017
Error Code for Printer Canon IP1300 IP1700 IP1200 IP1880 and IP1980
Error Code for Printer Canon IP1300 IP1700 IP1200 IP1880 and IP1980
Having problem with Canon IP1300, IP1700, IP1200, IP1880, IP1980. Sign that looked to be only led blinking. Following some solutions problem of printer that marked with led blinking.
3x Orange 1x green
Problem : any problem with printer mechanics
Solution: If you don’t have knowledge about printer mechanic, will better if bring the printer to Canon service center.
4x orange 1x green
Problem printer absorber full
Solution: Reset the printer using generaltools or software resetter. If not work using reset manual. Each printers having different set of manual reset
5x orange 1x green
Problem: Black or Color cartridge trouble.
Note: problem is usually caused many matters, for example chips error, conector is dirty, etc.
7x orange 1x green
Problem: Black or Color cartridge trouble.
Note: problem is usually caused many matters, for example chips error, conector is dirty, etc.
8x orange 1x green
Problem : printer absorber full (Waste Ink Pad Full)
Solution: Reset the printer using generaltools or software resetter. If not work using reset manual. Each printers having different set of manual reset
Available link for download
Tuesday, February 14, 2017
How to Backup and Restore Firefox Bookmarks
How to Backup and Restore Firefox Bookmarks
If you are a Firefox user like me, maybe this tips and tricks will be useful for you. Perhaps you have experienced things like this: you want to re-install the computer and you don’t want to lose all Firefox bookmarks in your computer, or you are using new computer and want to copy Firefox bookmarks into new computer, etc.
If you are experiencing the things mentioned above you can use the following tips and tricks to backup and restore Firefox bookmarks in your computer. You can bookmark and restore all Firefox without any third-party software because in Firefox there are features to backup and restore bookmark.
How to backup/copy all Firefox bookmarks in computer
To make a backup of your bookmarks, perform the following steps:
- Open Firefox. Click the “Bookmarks” menu and then click the “Organize Bookmarks” menu option, as highlighted below.
- After the library windows appear, click the “Import and Backup” button then click “backup”
- The “Bookmarks backup filename” dialog box appears. In this dialog box, specify the name of the backup file. Click the Save button. Done, you have created your Firefox bookmarks.


How to Restore Firefox bookmarks
- Click the Bookmarks and then Organize Bookmarks menu again. After the Library window appears, click the Import and Backup, Restore and then Choose File… option.
- Select a bookmarks backup then click the Open button.
- Click the OK button then Close the Library window. The bookmarks will be visible in the Bookmarks menu.


Available link for download
Thursday, February 9, 2017
Free Download PDF Tutorial and download ebook pdf gratis
Free Download PDF Tutorial and download ebook pdf gratis
FREE Download PDF TUTORIAL and Download ebook pdf gratis
Download gratis ebook, tutorial pdf, makalah, skripsi, modul, literatur di web scribd.com
untuk teman-teman yang sedang mencari ebook, tutorial pdf, makalah, skripsi, modul ataupun literatur bisa mencoba di alamat website scribd.com karena disini kita bisa mengambil ebook atau pun tutorial pdf secara gratis.
untuk mencobanya silahkan ketik di browser kamu dengan alamat http://scribd.com,, setelah itu akan muncul halaman utama dari website tersebut nah..sekarang tinggal anda ketikan di mesin pencari dia ebook, tutrial pdf, makalah, skripsi, modul, literatur atau apapun yang anda butuhkan maka akan ditampilkan semua hasilnya oleh database scribd.com
agar anda bisa mendapatkan ebook yang anda inginkan biasanya anda diminta login terlebih dahulu,, ada 2 login yang bisa digunakan untuk download gratis pada website scribd.com ini yaitu login dari akun facebook atau login dari akun scribc.com sendiri.
jika anda sudah memiliki akun facebook maka biasanya anda akan diminta untuk memasukkan email dan password anda namun jika anda tidak memiliki akun di facebook jangan kuatir...anda bisa daftar terlebih dahulu discribd.com untuk mendapatkan akunnya.
setelah mendapatkan akun baik di Facebook ataupun scribd.com maka anda siap untuk mendownload secara gratis ebook, tutorial pdf, makalah, skripsi, modul, literatur dan lain sebagainya di scribd.com.
akan tetapi ada kalanya jika file tersebut begitu bagus dan menarik untuk di download secara gratis scribd membatasinya sehingga kita tidak bisa langsung mendownload file tersebut tapi kita diharuskan mengupload terlebih dahulu sebuah file apapun baik ebook, tutorial, modul ke scribd.com ...baru setelah itu kita bisa download file tersebut.
pada posting Free download PDF tutorial and download ebook pdf gratis ini masih banyak kekurangannya maka dari itu jika teman-teman menemukan kesulitan ketika akan mendownload ebook pdf bisa memberikan komentar keluhan di kotak komentar yang tersedia
semoga bermanfaat.

Available link for download
Saturday, February 4, 2017
how to fix Error E14 and 1684 in CanonMX Series Printers
how to fix Error E14 and 1684 in CanonMX Series Printers
Ink cartridge is not supported (an ink tank that is sold in a different region from where the printer was purchased).
Available link for download
Friday, February 3, 2017
How to Reset Canon Pixma iP1200 iP1600 and iP2200
How to Reset Canon Pixma iP1200 iP1600 and iP2200
Canon Pixma iP1200, iP1600, iP2200 Resetter
- Download software for Canon iP1200, iP1600, 2200 Printers.
- Unzip downloaded file by WinZip, 7Zip, Izarc, etc
- Run GeneralTool.exe
- Select the connected USB port number from USB PORT
- Click LOCK RELEASE, and select the applicable model name in SET DESTINATION
- In CLEAR WASTE INK COUNTER, select MAIN or PLATEN. The selected waste ink counter will be reset. MAIN resets the main waste ink counter, PLATEN resets the platen waste ink counter.
Download Service Tool Software for Canon Pixma Printer iP1200, iP1600, iP2200
Available link for download
Wednesday, February 1, 2017
Home Image Effects v1 2 5 Custom image effects and random image generators
Home Image Effects v1 2 5 Custom image effects and random image generators
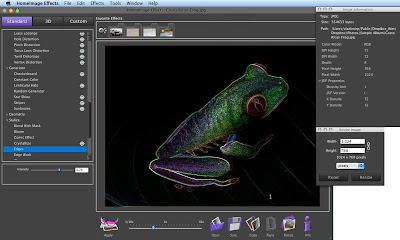
Home Image Effects has a simple and intuitive interface, making editing pictures a fun. Choose an mac image using the File menu, or just drag and drop it into the application editor window.
Apply the image effects listed in the Effects List on the left of the product window by clicking on the effect title. Multiple effects can be used by subsequent clicking on the Apply button, and selecting the next effect from the list.
Home Image Effects v1.2.5 Key Features:
- Core Image effects,
- OpenGL effects,
- Custom image effects, random image generators
- Save files to most often used formats ( JPG, TIF, PNG, BMP, SGI and more) with different resolution amounts,
- Rotating images by 90 angle,
- Flipping images,
- Resizing images,
- and more...
web developer
Available link for download
Monday, January 30, 2017
How to clean the printhead on Epson AcuLaser C1100 CX11N and CX21N
How to clean the printhead on Epson AcuLaser C1100 CX11N and CX21N

Antivirus ini adalah Trend Micro Internet Security 2010 yang merupakan Trend Micro versi terbaru saat ini. Trend Micro Internet Security 2010 merupakan antivirus ampuh yang didesain secara khusus untuk melindungi komputer anda dari virus, spyware, worm, trojan dan threat berbahaya lainnya. Trend Micro Internet Security 2010 akan memberikan perlindungan yang aman terhadap komputer rumah dan network anda.
Fitur utama Trend Micro Internet Security 2010 :
1. Antivirus Engine akan melindungi komputer anda dari virus, worm, trojan, serta aplikasi dan threat berbahaya lainnya.
2. Anti spyware technology akan melundungi informasi personal dan informasi penting anda dari spyware, adware, rootkit dsb
3. Anti spam technology untuk mendeteksi dan melakukan blocking spam email dan spam2 lainnya
4. Personal firewall untuk melindungi anda saat berinternet
5. Melindungi perubahan setting applikasi anda oleh software atau script berbahaya.
6. Melindungi anda dari phisisng scam yang mencoba mencuri informasi personal seperti credit card dan nomor rekening bank
7. Block link yang mencurigakan di email, website dan instant messages
8. Memiliki setting untuk melakukan blocking website dengan kategori tertentu, sangat bermanfaat untuk orang tua dalam melindungi anaknya dari akses situs yang tidak layak.
9. Memiliki fitur limit online time and duration untuk membatasi waktu berinternet anak anda.
10. Mencegah berjalannya aplikasi yang berbahaya di removable disk seperti USB disk dsb.
Sangat mantabh sekali bukan fiturnya..

memang Trend Micro adalah pemain lama dalam developer antivirus, sehingga antivirusnya ampuh dan berkualitas.
Trend Micro Internet Security 2010 yang harga normalnya $49,95 ini bisa sobat PG dapatkan secara gratis dan tentu saja legal.
Sobat PG bisa memilikinya beserta serial number legal dan gratis selama 1 tahun. untuk memiliki Trend Micro Internet Security 2010 silahkan sobat PG ikuti cara berikut ini :
1. Download installer hanya dari link dibawah ini
Trend Micro Internet Security 2010 32 bit (windows xp, vista dan windows 7)
Trend Micro Internet Security 2010 64 bit (windows vista dan windows 7)
2. Masukkan lisensi versi OEM gratis dan legal ini : pfeo-9996-0691-8113-9527
Ingat..dalam trik ini berlaku siapa cepat dia dapat..jadi buruan download sebelum masa promonya ditutup sama vendornya.
Available link for download
How to Setup and Install Windows XP
How to Setup and Install Windows XP
Step by Step Video Tutorial.
How to Setup and Install Windows XP.
Things you will need are...
Windows XP CD-ROM
Drivers and Utilities CD *If Needed.
*Some computers dont need a Drivers and Utility CD ROM, for Sound and Network Drivers, because you might have a separate for backup or driver support.
Put the Windows XP CD-ROM into your "default CD-ROM Drive".
Restart Windows. When prompted, there will be a choice on the Top Right hand corner of the screen. Press Any Key to boot from CD-ROM...
You Might need to change the drive configuration - SATA to IDE.
If you have a laptop, The Windows XP Disk will not work in most cases, because you have a SATA drive.
How to get arround the SATA Hard Drive Configuration.
1. When the computer loads up, hit F2 to access the setup menu for the computer.
2. Find where it says Hard Drive Configuration, Change it from SATA to IDE.
3. Save Settings and Exit.
4. Restart...
5. "Boot From CD-ROM Windows XP" and Boot From CD/DVD ROM Vista...
6. "PRESS ANY KEY"
Available link for download
Friday, January 27, 2017
How To Use FaceBook To Promote Your Business And Make Money
How To Use FaceBook To Promote Your Business And Make Money
Available link for download
Monday, January 23, 2017
HERE MY TUTORIAL TIPS AND TRIKS
HERE MY TUTORIAL TIPS AND TRIKS


Available link for download