Thursday, March 30, 2017
how to reset waste ink counter canon pixma ix5000 and ix4000
how to reset waste ink counter canon pixma ix5000 and ix4000
- Connect the Canon PIXMA iX5000 or iX4000 printer to the power cord. ( note : If the automatic power-on function is enabled in the printer, the printer enters the service mode for the first time, but it will never enter the service mode if the printer is turned off by the Power button. This is because the printer remains to be turned on internally if the power is turned off by the Power button. To prevent this, disconnection of the power cord is required before starting the printer in the service mode ) .
- With the Canon PIXMA iX5000 or iX4000 printer powered off, while pressing the Resume/Cancel button, press and hold the Power button. (note : Don’t release the buttons. The Power LED lights in green to indicate that a function is selectable.)
- While holding the Power button, release Resume/Cancel button. (Don’t release the Power button.)
- While holding the Power button, press Resume/Cancel button 2 times, and then release both the Power and Resume/Cancel buttons.
- When the Power LED lights in green, press the Resume/Cancel button 4 times to reset waste ink counter in the Canon Pixma iX5000 / iX4000. (note : If the Power LED does not light in green the printer does not enter the service mode, disconnect the power cord and plug it again. Then start from step 1 to start the printer in the service mode again).
- At the end of the service mode, press the Power button. The paper lifting plate of the sheet feed unit will be raised.
- Note :
- Each time the Resume/Cancel button is pressed, the Alarm and Power LEDs light alternately, Alarm in orange and Power in green, starting with Alarm LED.
- Other specified number of time(s) according to the function listed in the table below :
| Time(s) | LED indication | Function Remarks |
| 0 times | Green (Power) | Power off |
| 1 time | Orange (Alarm) | Service test print |
| 2 times | Green (Power) | EEPROM information print |
| 3 times | Orange (Alarm) | EEPROM initialization |
| 4 times | Green (Power) | Waste ink counter resetting |
| 5 times | Orange (Alarm) | Destination settings |
| 6 times | Green (Power) | Print head deep cleaning (Cleaning of both black and color) |
Available link for download
Wednesday, March 29, 2017
How to fix Error 1683 in Canon MX Series Printers
How to fix Error 1683 in Canon MX Series Printers
The remaining ink amount is unknown.
NOTE: Printing with a once empty ink tank can damage the printer.
Available link for download
How to Troubleshoot Scanning on a Canon MX870
How to Troubleshoot Scanning on a Canon MX870
The Canon PIXMA MX870 is an all-in-one inkjet printer capable of printing, sending and receiving faxes, and scanning documents. Somewhere along the line during ownership, you may run into problems while scanning. Most of these problems can be solved by either altering scan settings or by proper maintenance of the scanner. By tweaking the appropriate settings, you can get your built-in scanner up and running again
· Check the printer. Make sure that the power cord is plugged in and that the printer is turned on. Make sure one end of the USB cable is firmly connected to the printer, and the other end is inserted into a working USB port on your computer.
Available link for download
how to solve Error 2103 in Canon MX Series Printers
how to solve Error 2103 in Canon MX Series Printers
Note- Depending on the type of paper, the machine may not detect the paper width. Additionally, if the paper output cover is opened while printing is in progress, the machine may not detect the paper width.
Available link for download
Tuesday, March 28, 2017
how to excercise
how to excercise


SET OF EXERCISES/WORKOUTS FOR GIRLS/MOMMIES


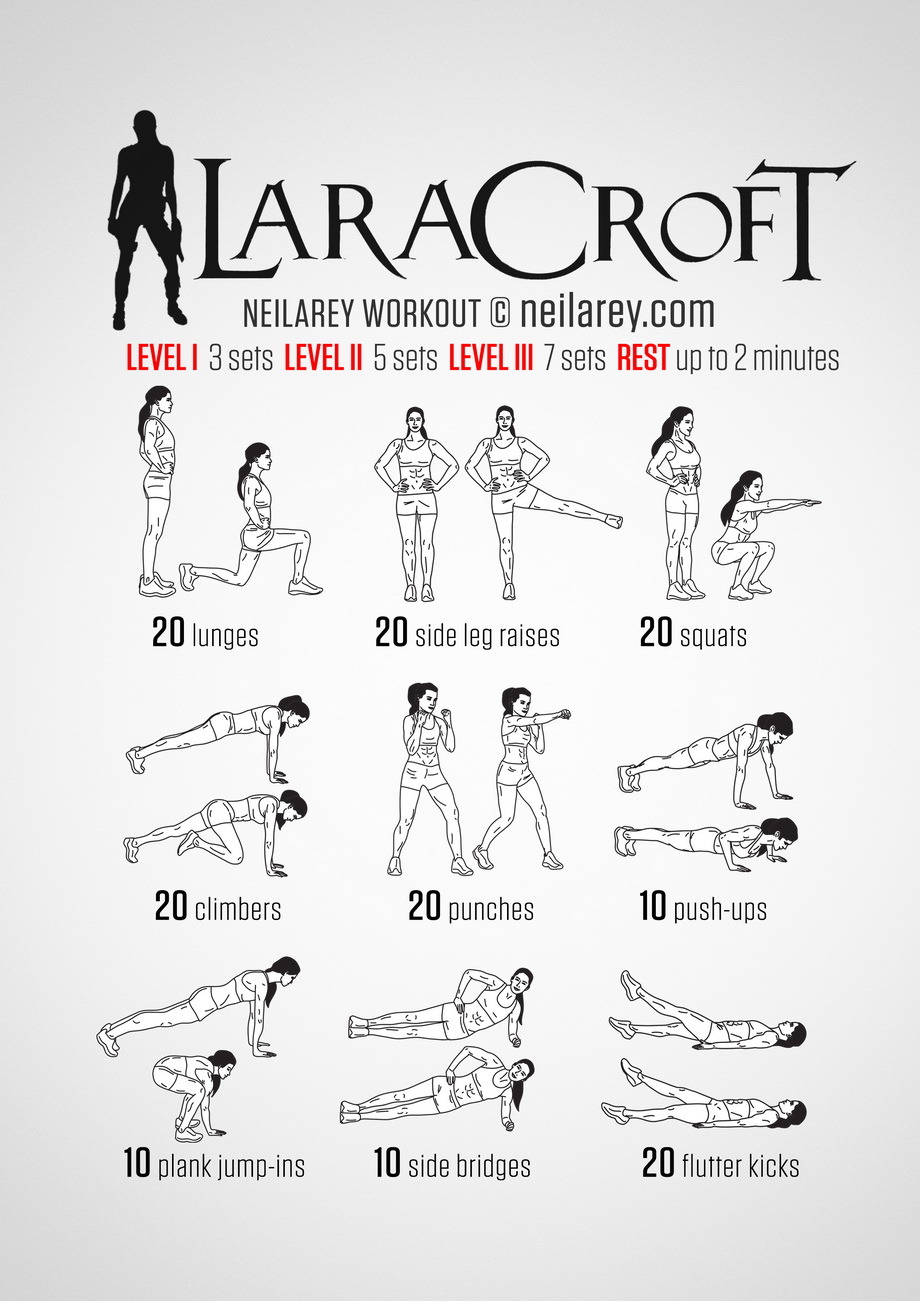


HEROES SET OF EXERCISES/WORKOUTS


Available link for download
Monday, March 27, 2017
How to Reset Canon Pixma MP110 and MP130
How to Reset Canon Pixma MP110 and MP130
How to Reset Canon Pixma MP110 and MP130
Try this methode to reset Canon Pixma MP110 and MP130 printers
Resetting overflow error code for Printer Canon Pixma MP110 :
- Turn on the printer.
- Click Menu, and then Scan, Copy and Scan again. All – entered the service mode.
- Select Counter
- Click Copy – everything. Waste dropped to zero.
- Turn off the printer POWER button.
Reset Canon Pixma MP130 Printer
- Turn on the printer.
- Press the MENU key, and then SCAN, COPY and SCAN again – entered the service mode.
- Select NVRAM ACCESS further OK.
- Select SET ABS-M LEVEL and set value equal to zero.
- Select SET ABS-R LEVEL (if any) and is set to zero.
- Turn off the printer POWER button.
Available link for download
Sunday, March 26, 2017

Saturday, March 25, 2017
Great Method to Studying Calculus
Great Method to Studying Calculus
However, after I know tutorvista.com, all my opinions about calculus lessons to be changed. For me calculus was fun and exciting. Tutorvista provide me Calculus help by providing the appropriate learning methods and good. So, I easily understand the calculus lessons. In addition, this website also has a Calculus tutor are friendly and very professional in the field of calculus. I chose tutorvista because it only needs an internet connection to get the lesson. I do not have to bother going to the course and spend my time and money. I also get a Free calculus help from this website. At first I was taught about Precalculus as a first step to know calculus. I take advantage of Precalculus help on this site. And you know that this web give you Free precalculus help so you can save your money.
I was happy to follow the lessons of this website because I get the correct method in studying calculus. They also provide learning services for 24 hours, so when I need their help, I can get help quickly. I would like to thank tutorvista because I am happy to study calculus.
Available link for download
How to Install GUI Languages in Windows 7 Windows Vista
How to Install GUI Languages in Windows 7 Windows Vista
Did you buy a Windows laptop from abroad and want it to talk to you in your mother tongue?
Try Vistalizator - this tool allows you to change display language in Windows editions other than (officially supported) Ultimate, like Starter, Home Basic, Home Premium and Business/Professional.
Vistalizator overrides the limit of one MUI language on non-Ultimate Windows editions.
Features
- Works in 32-bit and 64-bit Windows Vista/Windows 7
- Change Windows display language in less than 5 minutes! (Express installation mode)
- Uses official Microsoft Windows language packs
- You can install all 36 MUI languages and switch between them easily
- You can install 55 Windows Vista LIP languages on top of specific MUI languages
- You can install 59 Windows 7 LIP languages on top of specific MUI languages
- Compatible with Vista Service Pack 1/2 and Windows 7 Service Pack 1
- User Account Control (UAC) compliant - prompts for administrative privileges
- Windows Speech Recognition works with all supported languages:
Chinese, English, French, German, Japanese and Spanish - Languages can be installed either in Internal or in Express mode
Download Language Packs Here
Available link for download
Friday, March 24, 2017
How to Fix Error Code E13 and 1686 in Canon MX Series Printers
How to Fix Error Code E13 and 1686 in Canon MX Series Printers
Canon recommends using new genuine Canon cartridges in order to obtain optimum qualities.
Please view the compatible ink cartridges for your machine using our PIXMA ink finder.
NOTE - Since the information contained in the fax may be lost if it is printed in this condition, the received fax will not be printed and will be stored in the machines memory until the ink cartridge is replaced. You must manually print out faxes that were stored in the memory. You can change the setting so that the received fax is forcibly printed out instead of being stored in the memory, but all or part of the fax information may not be printed because of the ink out condition.
Available link for download
Thursday, March 23, 2017
How to clean an inkjet printhead
How to clean an inkjet printhead

How to clean an inkjet printhead
If you have any other solution, you can try to clean the printhead in order to solve your printing problem (message error or misprinting).It concerns inkjet printhead from Canon and some from Epson, Lexmark, Brother...
Cleaning an inkjet printhead:
- Remove the printhead from the printer.
- Put it in a dish filled with distilled water. Wait for a night.
- Be careful not to wet electronic components, only the nozzles:


- The next day, dry the prinhead thoroughly with a hairdryer.
- Then install it in the printer.
If the problem persist, the printhead is defective.
View PRINTERCLOUD | SUPPORT DRIVER PRINTERS
Available link for download
How to Fix Error 1486 E07 in Canon MX Series Printers
How to Fix Error 1486 E07 in Canon MX Series Printers
Available link for download
How to restore Start menu default settings Windows 7
How to restore Start menu default settings Windows 7
To restore Start menu default settings
Available link for download
Wednesday, March 22, 2017
How to Fix Error 1000 in Canon MX Series
How to Fix Error 1000 in Canon MX Series
There is no paper in the rear paper tray at the back of the printer.
Available link for download
How to Recover lost or deleted files windows 7
How to Recover lost or deleted files windows 7
Recover lost or deleted files
Available link for download
Tuesday, March 21, 2017
How to Manual Reset Printers Canon Pixma iP4200 iP5200 iP6000 and iP8500
How to Manual Reset Printers Canon Pixma iP4200 iP5200 iP6000 and iP8500
Canon Pixma iP4200, iP5200, iP6000, iP8500 Reset Procedure
- Turn off the Printers.
- Hold Resume button click POWER.
- Hold button RESUME, release POWER
- Then press the button again twice RESUME.
- Release all the buttons.
- Indicator led in green and stay green.
- Click the button 4 times RESUME, if you want to make another transaction. :
1 led- Orange – Service test print 1 times – Orange – Service test print
2 led – Green – EEPROM information print 2 times – Green – EEPROM information print
3 led – Orange – EEPROM initialization 3 times – Orange – EEPROM initialization
4 led – Green – Waste ink counter setting 4 time – Green – Waste ink counter setting
5 led – Orange – Destination setting (Press Power > Press Resume 3x) 5 times – Orange –
Destination setting (Press Power> Press Resume 3x)
6 led – Green – Print head deep cleaning 6 times – Green – Print head deep cleaning
11-13 led – Orange, Green, Orange – Return to menu selection
14 led – Green – Left margin correction 14 times – Green – Left margin correction
- Turn off the printer POWER button.
Available link for download
How to Fix Error 2101 in Canon MX Series Printers
How to Fix Error 2101 in Canon MX Series Printers
Available link for download
How to Reset Canon 1980 or Canon iP1900 series
How to Reset Canon 1980 or Canon iP1900 series
Although software resetter for Canon iP1980 or canon iP1900 series not available now. Doesn’t mean there is no way to reset the printer. To reset Waste Ink Tank canon iP1980 or iP1900 series follow this steps:
- Press Resume button hold for 1 – 2 minutes
- Open the cover
- Release the catridge and then put catridge again
- Close The Cover
- Turn Off
- Then Turn On again
Or try these methode :
- USE GENERAL TOOL http://www.ziddu.com/download/3063183/GeneralToolsforCanonPixmaip1880-xp.rar.html
- CHANGE USB PORT change into CANON PORT
- Click lock release
- Click ip1800
- Click device id
- Clear waste ink counter by clicking MAIN & PLATEN
- Check EEPROM Box
- Click EEPROM Dump
- Test pattern 1
- Your Done…
Available link for download
Monday, March 20, 2017
How To Make A Pizza
How To Make A Pizza

Pizza was thought of in Italy but traveled across the atlantic to begin in the U.S,it has now become a popular type of food, it can go with almost anything and creating your own could taste better than the ones you buy in the shop. This article will give you 2 different ways of creating your pizza, one method is faster than the other!
* Tomato paste
* Pepperoni
* Cheese
* Any other toppings you want.
* Olive oil(Optional)
Oven Method (Slower)
2. Buy ready-made pizza bases,. If you have plenty of time, then you can just get dough.
3. Spread tomato paste on your pizza base. .
4. Add a sprinkling of cheese.
5. Add any other toppings that you might enjoy
6. Place your pizza on an oven tray sprayed with olive-oil, so that the pizza doesn’t stick.
7. Put your pizza in the oven, and turn it down to about 160C or 320F degrees. #Take it out after about 15 – 25 minutes, depending on your oven. Use your own judgment to tell when the pizza is ready. The cheese should be a golden brown, but it should not be burnt.
2. Put on your toppings and arrange.
3. Grate the cheese over the pizza.
4. Simply put it under the grill. Be careful not to get burned and your pizza could sizzle and pop because of the common bubbles in the pizza crust.
5. Take it out after three minutes, it should be done!
2. Place your tomato base and toppings on.
3. Make sure your Wood-fired oven is very hot for the best pizza ever and to help the pizza cook faster.
4. Put your pizza into the oven, preferably on a tray so the base does not burn.
5. Turn your pizza every 30 seconds for two minutes, and at the 1:30 mark take it off the tray. Now your pizza should be done.
6. Take your pizza out and enjoy!
Available link for download