Thursday, March 30, 2017
how to reset waste ink counter canon pixma ix5000 and ix4000
how to reset waste ink counter canon pixma ix5000 and ix4000
- Connect the Canon PIXMA iX5000 or iX4000 printer to the power cord. ( note : If the automatic power-on function is enabled in the printer, the printer enters the service mode for the first time, but it will never enter the service mode if the printer is turned off by the Power button. This is because the printer remains to be turned on internally if the power is turned off by the Power button. To prevent this, disconnection of the power cord is required before starting the printer in the service mode ) .
- With the Canon PIXMA iX5000 or iX4000 printer powered off, while pressing the Resume/Cancel button, press and hold the Power button. (note : Don’t release the buttons. The Power LED lights in green to indicate that a function is selectable.)
- While holding the Power button, release Resume/Cancel button. (Don’t release the Power button.)
- While holding the Power button, press Resume/Cancel button 2 times, and then release both the Power and Resume/Cancel buttons.
- When the Power LED lights in green, press the Resume/Cancel button 4 times to reset waste ink counter in the Canon Pixma iX5000 / iX4000. (note : If the Power LED does not light in green the printer does not enter the service mode, disconnect the power cord and plug it again. Then start from step 1 to start the printer in the service mode again).
- At the end of the service mode, press the Power button. The paper lifting plate of the sheet feed unit will be raised.
- Note :
- Each time the Resume/Cancel button is pressed, the Alarm and Power LEDs light alternately, Alarm in orange and Power in green, starting with Alarm LED.
- Other specified number of time(s) according to the function listed in the table below :
| Time(s) | LED indication | Function Remarks |
| 0 times | Green (Power) | Power off |
| 1 time | Orange (Alarm) | Service test print |
| 2 times | Green (Power) | EEPROM information print |
| 3 times | Orange (Alarm) | EEPROM initialization |
| 4 times | Green (Power) | Waste ink counter resetting |
| 5 times | Orange (Alarm) | Destination settings |
| 6 times | Green (Power) | Print head deep cleaning (Cleaning of both black and color) |
Available link for download
Tuesday, March 21, 2017
Epson R200 R210 R300 R310 Waste Ink Counter Pad Reset
Epson R200 R210 R300 R310 Waste Ink Counter Pad Reset
Here is how to reset the waste counter for the Epson R200, R210, R300 and R310 printers.
- Press and hold “Stop”, “Maintenance”, and “Power” buttons for about 10 seconds. A message will come on the screen saying counter is reset and to turn the printer off. The R200 and others don’t have a screen so just wait until the 10 seconds is up.
- Turn the printer off, unplug the power cord. Wait about 1 minute and power the printer back up. The counter will be reset. That’s all there is to the reset procedure.
Is the waste pad full ?
If the waste pad is actually full and ink is about to overflow, then you need to install a waste container. You can see the waste pad by opening the access panel on the back of the printer.
Changing the waste pad requires almost complete disassembly of the printer, it is a big job. There is an easier way.
Open the access panel on the rear of the printer (remove screw) and look inside carefullly with a flashlight. You will see a tube (down and to your left) coming from the cleaning pump and it will have an open end on it. This is the tube that delivers ink to the waste pad.
Use a piece of coathanger wire or equivalent, and fish out this piece of tube. Bring it to the outside of the printer, thru the access panel.
Find yourself a suitable container (Tupperware or a plastic cup or jar) that is not too tall. Put the tube into this container and secure the tube and container so they won’t come apart or lose connection if the printer is moved.
If you wish you can make a hole or notch in the access panel cover so it can be replaced.
Now the ink will go into this container and not into the waste pad inside the printer. If it gets full, dump it.
Note: This information and a couple of photos are also available on Steve’s Digicam Forum (http://stevesforums.com/forums). Goto Printers-Photo Inkjet-Epson R200-210 & R300-310 Mod
Download Software Resetter for Epson R300-310
Available link for download
Sunday, February 26, 2017
How to Reset ink counter on Canon MP198
How to Reset ink counter on Canon MP198
 Kepada sobat-sobat blogger..ehm..kali ini mau share tentang Tutorial SQL Injection,, filenya ada dalam bentuk document yang bisa anda download ..tapi apa sih sebenarnya pengertian SQL Injection itu sendiri,, SQL Injection merupakan teknik mengeksploitasi web aplikasi yang didalamnya menggunakan database untuk penyimpanan data.
Dalam Ebook ini anda akan diperkenalkan apa itu SQL Injection,, Contoh SQL Injection seperti SQL Injection pada URL maupun pada script PHP…sampai dengan cara pencegahannya,, Jadi ebook yang satu ini bagus untuk untuk baca.sebagai salah satu bahan referensi..
Ingat..
Download : TutorialSQLInjection.doc
Available link for download
How to reset waste ink pad counter on Epson printer
How to reset waste ink pad counter on Epson printer

Solution 1: free
- Dowload SSC Service Utility Software.
- You can reset all these printers: Epson Stylus ?olor 400/440/480 LPT/480SXU/580/600/640/660/670/680/777/740/760/ 800/850/860/880/900 / EM-900C/980/1160/1520/3000
C20 / C40 / CL-750/C41 / C42 / C43 / C44 / C45 / C46 / C47 / C48/C50/C60/C61
C62 /C63 / C64 /C65 / C66/C67 / C68 / D68/C70/C80/C82/C83 / C84/C85 / C86/C87
C88 / D88 and PE
Photo RX420 / RX425 / RX430 /RX500 / RX510/RX520/RX600 / RX610/RX620/RX700 CX3100 / CX3200/CX3500 / CX3600 / CX3650/CX3700/CX3800 / CX3810 / DX3800/CX4500 CX4600/CX4100 / CX4200 /CX4700 / CX4800/DX4200 / DX4800 /CX5100 / CX5200 /CX5300 / CX5400 CX6400 / CX6600 /CX6300 / CX6500 /CX7800 Photo /Photo EX /Photo 700 / IP-100/750 / PM-770C /780 / 790 /
PM-780C /810 / 820
Photo 820 /825 / 915/830 / 830U/870 / PM-875DC /R200 / R210/R220 / R230
R300 / R310 / Photo R320/R800 / PX-G900/R1800/R2400/890/PM-890C/PM-A700
PM-G720/PM-970C/895/ 785EPX
Photo 900 /925 / 935/ 950 / 960 / PM-950C/1200 / PM-3000C/1270 / PM-3300C/1280 / PM-3500C
Photo 1290/2000P/2100/2200 / PM-4000EPX/Pro 5000 / PM-5000C
Solution 2: free
- On this Epson Website https://ipr.ebz.epson.net/ipr/maintenance.do you can reset these printers: Artisan 50, 700, 710, 725, 800, 810, 835, PictureMate Charm PM225, PictureMate Dash, PictureMate Show PM300, PictureMate Zoom, Stylus C120, Stylus CX4400, CX4450, Stylus CX7400, CX7450, Stylus CX8400, Stylus CX9400Fax, Stylus NX100, NX105, NX200, NX215, NX300, NX400, NX415, NX420, NX510, NX515, NX625, Stylus Photo R1900, R280, R2880, RX595, RX680, WorkForce 30, 40, 60, 310, 315, 320, 323, 325, 500, 520, 600, 610, 615, 630, 633, 635, 840, 1100
Solution 3: you have to pay
- Download WIC Reset Utility, You can do many things like: checking the current value of waste ink counters and ink level counters, resetting ink level counters in printers L100, L200, L800 only, cleaning printhead, and so on....
- But for restting the waste ink counter, you have to buy a reset key
Solution 4: you have to pay
- You can buy a disc to reset the waste ink counter on Ebay
Available link for download
Wednesday, February 15, 2017
How to Reset Epson C110 Waste Ink Counter
How to Reset Epson C110 Waste Ink Counter
 Reset procedure for Epson C110 almost the same as reset Epson C90 or Epson C79. Date setting must be used in the PC for software resetter Epson C110 is 11 April 2008.
Before run resetter for epson c110, change date setting in your computer to run adjustment program for Epson C110 without error, its way :
- Click Start then select Control Panel. In control panel windows appears select date and time (classis view). If control panel in your computer is category view select “date, time, language, and regional setting” then select date and time, or to open date and time setting quickly double click the clock in the system tray (systray).
- Then change date setting in the computer to to 11 April 2008
Following Steps by Steps to resetting waste ink counter pad Epson C110 :
- Download software resetter untuk Epson C110
- Extrack resetter for Epson C110
- Turn on the printer.
- Run adjustment program for Epson C110 “AdjProg.exe” file. then Click “Accept”.
- Select “Particular adjustment mode”.
- Then select Waste Ink pad Counter then click OK.
- Click Check button, to read waste ink counter pad, the await til finish.
- Click Initialization button to reset waste ink counter pad to 0 then click Finish.
- Turn the printer off the turn on again.
- Once the process the printer should be normal again.
- To view the result test print the printer.
Available link for download
Sunday, December 18, 2016
How to Reset Waste Ink Counter Epson CX7300 CX8300 and CX9300F
How to Reset Waste Ink Counter Epson CX7300 CX8300 and CX9300F
Here How to use this software :
- Download the adjustment program (see under)
- Extrak adjustment you have downloaded
- Go to The extrakded folder then click tricks-collections.bat file
- Now set the date setting in you PC to 11 April 2008,
- Run adjustment program by click AdjProg.exe file the click accept
- Click Particular adjustment mode then select destination and printer port then click OK
- Select Waste ink pad counter from the below window and double-click to execute it
- Click [Check] button to check current protection counter’s value.
- Then Click [Initialization] to reset the protection counter to the initial value. Thats all.
- After finishing, you can change the date to normal.
Download Adjustment program for epson CX8300
Download Adjustment program for epson CX9300F
Available link for download
Saturday, December 17, 2016
Free Download Portable Counter Strike 1 6
Free Download Portable Counter Strike 1 6
 Counter-Strike pertama kali dikembangkan sebagai modifikasi Half-Life, Oleh karena itu dinamakan "Half-Life: Counter-Strike." Sejak awal, Counter Strike adalah jenis permainan yang mana pemain tidak dapat menyembuhkan dirinya sendiri. Artinya, setelah tertembak, maka tenaga sang pemain akan berkurang dan tidak akan kembali seratus persen lagi. Dilihat dari sisi pengguna, Counter Strike merupakan permainan yang user-friendly. Alasannya, Counter Strike Condition Zero sangat ringan dan tidak terlalu memakan banyak memori untuk menikmati permainannya. Dan permainan ini cukup menghibur, terutama jika dimainkan dalam skala besar dengan mode multiplayer yang memungkinkan teman-teman kita hanya dengan bermodalkan kabel LAN atau perangkat wireless LAN, kita sudah dapat menikmati permainan ini dengan orang-orang terdekat kita tanpa harus terhubung dengan internet.
 Available link for download
Friday, December 9, 2016
How to Reset Counter Epson 9000 Printer
How to Reset Counter Epson 9000 Printer
 Following steps how to reset epson Epson 9000’s waste ink counter (to cure the 00000100 error code)
- Press these three buttons while turning on the printer, Paper Source, Paper Feed – (not +), Cut/Eject.
- The LCD panel reads : INIT. ALL=EXEC.
- Push the Paper Source button 9 times. The LCD panel reads : INIT. WA. INK=EXEC.
- Press Cut/Eject button to enter. All lights on the printer control panel will turn on then back to normal.
- Turn off the printer.
Available link for download
Friday, December 2, 2016
Epson Stylus Pro 4000 Waste Ink Counter Reset
Epson Stylus Pro 4000 Waste Ink Counter Reset

1. blink 4x orange 1x green
2. Green orange berkedip bergantian selama 7x (Ink Absorber Full),
3. Orange 8x ink tank full
Berikut langkah-langkah Reset IP1980 :
1. Driver harus sudah di install. Jika belum punya drivernya klik disini.
2. Printer harus dalam keadaan service mode (temporary reset) .
Untuk mengaktifkan service mode:
- Cabut kabel power listrik
- Tekan power (di printer)
- Colokan power listrik (lampu akan berwarna hijau)
- Sambil menekan power tekan tombol resume (lampu berubah orange)
- Lepas keduanya (printer akan mati)
- Tekan tombol power lagi dan langsung lepaskan.(lampu akan berwarna hijau) (jangan mencabut power listrik)
4. Cabut power listrik, colokan kembali dan nyalakan (printer initial/tunggu sampai lampu tdk berkedip. Selesai
Cara menjalankan General Service Tool

- Exctrak file yang anda download
- Resolusi Windows harus 1024x768
- Jalankan file "GeneralTool.exe"
- Pilih USB Port
- Centang Cleaning dan Eeprom Clear
- Klik Main
- Klik Platen
- Selesai Quit
- Matikan printer dengan menekan power.
Selamat mencoba ..................
Available link for download
Wednesday, November 30, 2016
EPSON Stylus Photo 750 Counter Reset
EPSON Stylus Photo 750 Counter Reset

Download AutoPlay Media Studio adalah pilihan tepat untuk memudahkan Anda membuat perangkat lunak multimedia yang interaktif sendiri. Bahkan jika Anda bukan seorang programmer, Anda akan dengan mudah membuat proyek-proyek profesional dalam waktu singkat. Ini semua dilakukan dengan benar-benar visual, menggunakan model drag-and-drop. Dari gambar, teks, kotak centang, radio button dan musik untuk tayangan slide, video, Flash dan konten Web, Anda hanya memindahkan barang-barang ke tempat menggunakan mouse anda.
http://www.mediafire.com/?iitrgzym1mk
http://www.megaupload.com/?d=73G2KNYR
Available link for download
Saturday, November 26, 2016
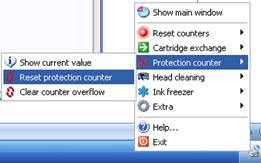
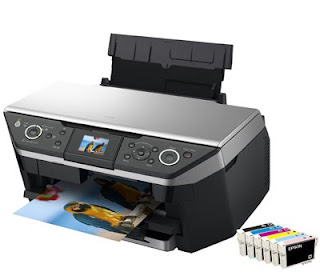
How to Reset Waste Ink Protection Counter Epson CX6500
How to Reset Waste Ink Protection Counter Epson CX6500
With a scanning resolution of 1200 x 2400dpi and 48-bit colour depth, the EPSON STYLUS CX6500 combines scanning-specific hardware and software technologies to deliver outstanding results. The powerful EPSON Scan Software driver can function in three different user interface modes, allowing the scanner to adjust to the user’s scanning experience and needs. It features an easy-to-use Colour Restoration tool, which applies sophisticated technology to substantially restore image colour in photos that have been subjected to fading and other colour loss influences.
Follow the step to reset wast ink Epson CX6500 :
- Press and hold B/W+COLOR+END
- Push power on button, don’t release all the button until you see the light indicator is blinking and then a message display on the LCD
- Release your fingers from the button
- Press the COLOR button to clear protection counter
- Press power button (turn off)
- Done
Available link for download
Friday, November 25, 2016
How to Reset Epson R200 R210 R300 R310 Waste Ink Counter
How to Reset Epson R200 R210 R300 R310 Waste Ink Counter
 Epson R200, R210, R300, R310 Waste Ink Counter Pad Reset
Here is how to reset the waste counter for the Epson R200, R210, R300 and R310 printers.
- Press and hold “Stop”, “Maintenance”, and “Power” buttons for about 10 seconds. A message will come on the screen saying counter is reset and to turn the printer off. The R200 and others don’t have a screen so just wait until the 10 seconds is up.
- Turn the printer off, unplug the power cord. Wait about 1 minute and power the printer back up. The counter will be reset. That’s all there is to the reset procedure.
Is the waste pad full ?
If the waste pad is actually full and ink is about to overflow, then you need to install a waste container. You can see the waste pad by opening the access panel on the back of the printer.
Changing the waste pad requires almost complete disassembly of the printer, it is a big job. There is an easier way.
Open the access panel on the rear of the printer (remove screw) and look inside be carefully with a flashlight. You will see a tube (down and to your left) coming from the cleaning pump and it will have an open end on it. This is the tube that delivers ink to the waste pad.
Use a piece of coat hanger wire or equivalent, and fish out this piece of tube. Bring it to the outside of the printer, turn the access panel.
Find yourself a suitable container (Tupperware or a plastic cup or jar) that is not too tall. Put the tube into this container and secure the tube and container so they won’t come apart or lose connection if the printer is moved.
If you wish you can make a hole or notch in the access panel cover so it can be replaced.
Now the ink will go into this container and not into the waste pad inside the printer. If it gets full, dump it.
Download Software Resetter for Epson R300-310
Available link for download
Sunday, October 23, 2016
How to Reset Counter Epson Stylus C80
How to Reset Counter Epson Stylus C80
 There two way to Reset counter Epson Stylus C80, are : Reset Manual and using drtool software
Manual reset methods
- Hold down both the paper and ink buttons while you turn on the power.
- When the paper out LED is just flashing release both buttons and press and hold the inkcleaning button for at least 10 seconds.
- The printer will cycle through and self check for about 3 minutes and then function normally.
Using DRTool
- Run DRTool software
- Set printer model to C80
- Click reset protection counter
Available link for download
Wednesday, October 19, 2016
How to Reset counter Epson Stylus Photo RX700 Using Software Resetter
How to Reset counter Epson Stylus Photo RX700 Using Software Resetter
Reset Using adjustment program RX700
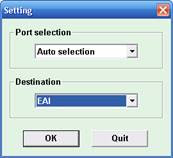
- Download Adjustment Program for Epson RX700 and extrac the adjustment program. Then goto extracded folder and the run by clicking AdjProg.exe. to use this software no need date setting must be alter in the PC.
- Click pasticular adjustment mode button
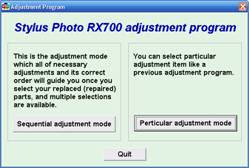
- Select port selection and destination and equal to the printer.
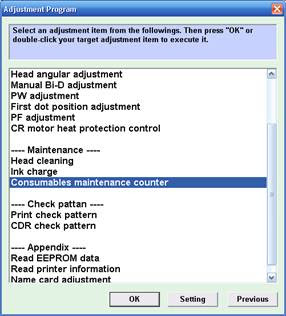
- Select Consumables maintenance counter. Then press “OK” or double-click to execute it.
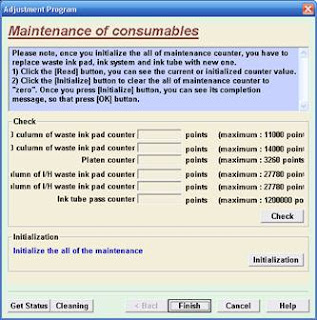
- Click the Initialize button to clear the all of maintenance counter to “zero”. Once you press [Initialize] button, you can see its completion message, so that press OK. To see the current or initialized counter click Read button.
Reset Using SSCServe 4.30
- Download and install SSCServe software then select printer model and equal to the printer and then close the setting.
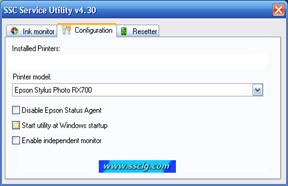
- Open SSC menu by right clicking mouse on SSC icon in the systray, choose protection counter and the choose reset protection counter.
Download Adjustment Program Epson RX700 in 7z format (3,82 MB)
Download Adjustment Program Epson RX700 in Zip format (4,37 MB)
Available link for download
Monday, October 17, 2016
How to Reset Counter Canon ip2770
How to Reset Counter Canon ip2770

Available link for download
Friday, October 14, 2016
How to Reset Counter Epson Stylus C63 C64 C65 C66
How to Reset Counter Epson Stylus C63 C64 C65 C66

- Run adjustment software by clicking ”APSC6364_Ver16.exe“
- Set model name and port, Ok
- Click maintenance tab
- Check waste ink pad counter
- Click reset
- Run SSC serve software
- Set printer model setting in ssc serve to C63/C64/C65/C66 the close the setting
- Right click ssc icon in system tray, select protections counter, select reset protection c counter.
- Clcik Yes
Available link for download
Monday, October 10, 2016
How to Reset Waste Ink Counter Canon Pixma MP145
How to Reset Waste Ink Counter Canon Pixma MP145
I get from forum but still untried, just sharing for the things requiring reset procedure for Canon Pixma MP145 to reset counter in the Canon Pixma mp145. Following is the procedure to reset waste ink counter Canon Pixma MP145 :
Available link for download
Wednesday, October 5, 2016
How to Reset Counter Epson RX690 With Adjustment RX690
How to Reset Counter Epson RX690 With Adjustment RX690
 This one again working software resetter by OrTHoTaMiNe. The Adjustment RX690 has cracked by OrTHoTaMiNe. The Adjustment Program Epson RX690 no require date setting, you run the software by clicking AdjProg.exe directly. All features of adjustment program epson stylus photo RX690 working properly.
Epson RX690 Inkjet Multifunction Printer printing, copying and scanning. The usability of the printer is very high and the RX 690 is very easy to install and run within a few minutes.
Here how to reset Waste Ink counter pad epson RX690
- Run adjustment epson RX690, then click accept
- Click select button to set printer setting. Then click particular adjustment mode

- Select “Waste Ink Pad Counter” from adjustment item. Click Ok or double click to execute the item.

- Check mark main pad counter, platen pad counter and pad counter of 80 culmu then click initialization to reset the counter to 0%, click accept.

Available link for download
Sunday, October 2, 2016
How to Reset Canon i255 and i320 Waste Ink Counter
How to Reset Canon i255 and i320 Waste Ink Counter
Reset Methode for Canon Printers i255, i320
Step 1 : Manual for service mode
- Unplug power and USB.
- Open door and hold power button.
- Connect power.
- Close door, then release power button.
- Turn off the printer. And disconnect the printer cable.
- Press and hold the POWER button, turn on the printer.
- The indicator LED should be green.
- Press and release the RESUME button , the indicator LED should be orange.
- Press and release the RESUME button again, the indicator LED should be green.
- Release both buttons.
Step 2 : Software for Permanent
- Reconnect the printer cable.
- Download and Run General Tools software resetter for Canon printers i320, i255 then
- Select USB PORT
- Choose SET DESTINATION 1 And it should be reset.
Available link for download