Friday, March 10, 2017
How to Reset Canon Pixma Mp150 Mp160 Mp170 Mp180 Mp450 and Mp460 Using Mptool Software
How to Reset Canon Pixma Mp150 Mp160 Mp170 Mp180 Mp450 and Mp460 Using Mptool Software
Besides service tool, mptool is the popularness software to reset printers canon pixma series like MP150, MP160, MP170, MP180, MP450 and MP460. Excess of software that is the program measure of small and amenity of usage. Ability of the software that is to reset level black and color cartridge at canon pixma mp series. And there also facility to write and read EEPROM in the printer. Other excess this software is detect automatically installing printers in the computer.
Reset Ink Counter.
Reset ink counter that is resetting ink level (ink metrer) cartridge at printer.
Reset waste ink counter
To reset waste ink counter at printers canon pixma MP150, MP160, MP170, MP180, MP450 and MP460 there any 2 choice, that is :
Download MPTool Software support for Canon MP150, MP160, MP170, MP180, MP450, MP460
Available link for download
Wednesday, March 8, 2017
Thursday, February 9, 2017
How to perform the wireless LAN setup using WPS connection Windows
How to perform the wireless LAN setup using WPS connection Windows

After confirming the connection, perform the following instructions to add (connect) the machine to the network.
B: Access point or wireless router, etc.
- The configuration, router functions, setup procedures and security settings of the network device vary depending on your system environment. For details, refer to your device?s instruction manual or contact its manufacturer.
- Check if your device supports IEEE802.11n/g/b.
- In an office setup, consult your network administrator.
- If you connect to a network that is not protected with security measures, there is a risk of disclosing data such as your personal information to a third party.
- If an error message appears or if you have trouble with the network connection, refer to the printed manual: Network Setup Troubleshooting.
Use the Menu button (A) to select Device settings.
Select WLAN active/inactive, then press the OK button.
Select Wireless LAN active, then press the OK button.
When wireless connection is enabled, the Wi-Fi lamp (C) lights blue.
Select Wireless LAN setup, then press the OK button.
Select WPS, then press the OK button.
Select PIN code method in 7, then press the OK button. Follow the on-screen instructions to operate the machine and access point. When the screen in 9 appears, press the OK button.
Press and hold the WPS button on the access point (for about 5 seconds), then press the OK button on the machine within 2 minutes.
For details on the WPS button pressing, refer to the manual of your access point.
The Wi-Fi lamp (blue) on the machine flashes while searching for or connecting toan access point.
When the above screen appears, press the OK button.
- If the timeout error screen appears, press the OK button, then start over from 8.
Software Installation
- Quit all running applications before installation.
- Log on as the administrator (or a member of the Administrators group).
- Do not switch users during the installation process.
- Internet connection may be required during the installation. Connection fees may apply. Consult the internet service provider.
- It may be necessary to restart your computer during the installation process. Follow the on-screen instructions and do not remove the Setup CD-ROM during restart. The installation resumes once your computer has restarted.
Turn on the computer, then insert the Setup CD-ROM into the CD-ROM drive.
The setup program starts automatically.
(Windows 7/Windows Vista)
Windows XP
Click Run Msetup4.exe on the AutoPlay screen, then click Yes or Continue on the User Account Control dialog box.
If the User Account Control dialog box reappears in following steps, click Yes or Continue.
Select your place of residence, then click Next.
Select a country or region, then click Next.
Click Easy Install.
The drivers, application software, and on-screen manuals are installed.
Click Install.
Select Use the printer with wireless LAN connection, then click Next.
Follow any on-screen instructions to proceed with the software installation.
When the Printer Detection screen appears, click Next.
Click Cancel and start again from 6, then be sure to select Use the printer with wireless LAN connection in 8.
Make sure that any of the lamps on the mode buttons (A) lights, then click OK.
When the Detected Printers List dialog box appears, select Canon MX410 series, then click Next.
When the Setup Completion screen appears, click Complete or OK.
Follow any on-screen instructions to proceed with the software installation.
The User Registration screen will only be displayed when Europe, Middle East, Africa is selected on the Select Your Place of Residence screen.
- Installing the XPS Printer Driver
Monday, December 12, 2016
Format the Pendrive to NTFS file system using command prompt
Format the Pendrive to NTFS file system using command prompt
For doing this, go to "Properties" of the pendrive and select "Hardware" tab and select the Pendrive from the listed disks then click on "Properties". Then click on "Policies" tab and enable the option "Better performance" and click "OK". Now run the below command in command prompt.
In the below command "g" is the drive letter of the USB flash drive.
C:>format g: /q /fs:ntfs
Available link for download
Monday, November 21, 2016
How to burn a ISO Image using Nero Burning ROM
How to burn a ISO Image using Nero Burning ROM

An ISO image is an archive file (also known as a disc image) of an optical disc, composed of the data contents of every written sector of an optical disc, including the optical disc file system. ISO images can be created from optical discs, or can be used to recreate optical discs using software from many software vendors. ISO image files typically have a file extension of .iso. The name ISO is taken from the ISO 9660 file system used with CD-ROM media, but an ISO image might also contain a UDF file system. -Wikipedia
Heres what you need:
A Blank CD or DVD
A ISO Image you wish to burn to CD
1. Start a Nero Burning ROM Apps

2. In the Recorder Menu select Burn Image

3. Select your ISO file you wish to burn

4. Click Burn and wait for the CD to eject.
Available link for download
Tuesday, October 25, 2016

Wednesday, October 19, 2016
How to Reset counter Epson Stylus Photo RX700 Using Software Resetter
How to Reset counter Epson Stylus Photo RX700 Using Software Resetter
Reset Using adjustment program RX700
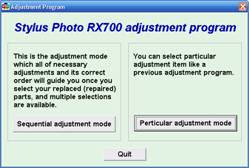
- Download Adjustment Program for Epson RX700 and extrac the adjustment program. Then goto extracded folder and the run by clicking AdjProg.exe. to use this software no need date setting must be alter in the PC.
- Click pasticular adjustment mode button
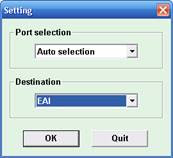
- Select port selection and destination and equal to the printer.
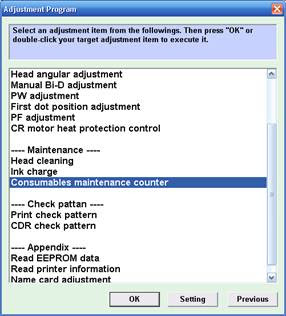
- Select Consumables maintenance counter. Then press “OK” or double-click to execute it.
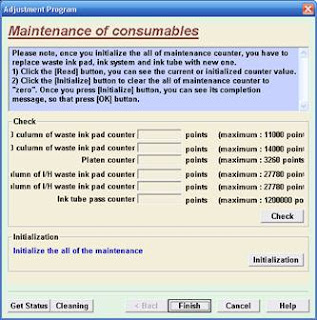
- Click the Initialize button to clear the all of maintenance counter to “zero”. Once you press [Initialize] button, you can see its completion message, so that press OK. To see the current or initialized counter click Read button.
Reset Using SSCServe 4.30
- Download and install SSCServe software then select printer model and equal to the printer and then close the setting.
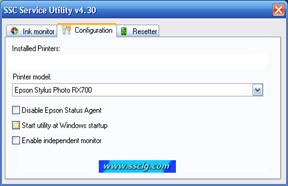
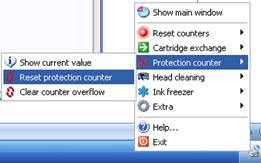
- Open SSC menu by right clicking mouse on SSC icon in the systray, choose protection counter and the choose reset protection counter.
Download Adjustment Program Epson RX700 in 7z format (3,82 MB)
Download Adjustment Program Epson RX700 in Zip format (4,37 MB)
Available link for download
Saturday, October 8, 2016
How to Reset Canon Printers using Service Tool or Software Resetter
How to Reset Canon Printers using Service Tool or Software Resetter
Generally, Canon resetter programs have similar resetting procedure except for some models. So that successful resetting canon printers using service tool all file attributes of software resetter should not be read only and don’t run the software from CD. There are two version of general tool for canon printer that is with lock release button and do not have Lock Release button.
For resetter with Lock Release button (found inside the executable file)
For resetter which do not have Lock Release button
Available link for download
Friday, September 30, 2016
How to Open CDROM Drive using notepad
How to Open CDROM Drive using notepad

copy paste this code to notepad
Set owMP = CreateObject("WMPlayer.OCX.7")
Set colCDROMS = oWMP.cdromCollection
if colCDROMS.Count >= 1 then
for i = 0 to colCDROMS.count - 1
colCDROMS.item(i).Eject
Next cdrom
end if
then save it to whateveryouwant.vbs then double click the files.
Available link for download