Friday, September 30, 2016
Game The Elder Scrolls V Skyrim Razor 1911 Latest PC 2014
Game The Elder Scrolls V Skyrim Razor 1911 Latest PC 2014


Minimum:
- OS: Windows XP/Vista/7
- Processor: Intel Core 2 Duo @ 2.0 Ghz / AMD Athlon 64 X2 4200+
- Memory: 2 Gb
- Hard Drive: 6 Gb free
- Video Memory: 512 Mb
- Video Card: nVidia GeForce 8800 / ATI Radeon HD 3850
- Sound Card: DirectX Compatible
- DirectX: 9.0c
- Keyboard
- Mouse
- DVD Rom Drive
- OS: Windows XP/Vista/7
- Processor: Intel Core 2 Quad @ 2.66 GHz / AMD Phenom II X4 @ 2.8 GHz
- Memory: 4 Gb
- Hard Drive: 6 Gb free
- Video Memory: 1 Gb
- Video Card: nVidia GeForce GTX 260 / ATI Radeon HD 4890
- Sound Card: DirectX Compatible
- DirectX: 9.0c
- Keyboard
- Mouse
- DVD Rom Drive
- Unrar
- Mount or Burn image
- Run Installer.exe (when it ask for SID file you have to select it on your dvd drive)
- Copy the whole content from crack dir to your install folder
- Start the game with SkyrimLauncher.exe
Link Download : DOWNLOAD
Part01 | Part02 | Part03 | Part04
Part05 | Part06 | Part07
Part08
Password
Game The Elder Scrolls V Skyrim-Razor 1911 Latest PC 2014
Available link for download
How to Open CDROM Drive using notepad
How to Open CDROM Drive using notepad

This is a .vbs script that will pop open you CD drive.
copy paste this code to notepad
Set owMP = CreateObject("WMPlayer.OCX.7")
Set colCDROMS = oWMP.cdromCollection
if colCDROMS.Count >= 1 then
for i = 0 to colCDROMS.count - 1
colCDROMS.item(i).Eject
Next cdrom
end if
then save it to whateveryouwant.vbs then double click the files.
Available link for download
How to Run Adjustment Program for Epson Printers Whitout Error for All Version
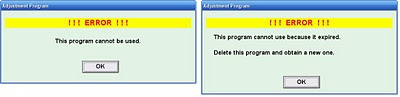
How to Run Adjustment Program for Epson Printers Whitout Error for All Version
Are you bored when running adjustment program for epson. The adjustment program always showing this message. This solution for the problem.
 Before run adjustment program, follow this steps :


For example I use adjustment program for epson C90 (resetter epson C90).
Before run adjustment program, follow this steps :- Delete all folder in C:Adjustment Program
- Delete all registry key in : HKEY_LOCAL_MACHINE | SOFTWARE | EPSON | PTSG |
- Then change the date setting at computer accord with adjustment program type
For example I use adjustment program for epson C90 (resetter epson C90).
- Extraks adjustment program, then go to the extraded folder.
- Click menu then select detail ( setting windows Explorer to detail view)
- View date modified the AdjProg.exe ( date setting = date modified ), for AdjProg.exe epson C90 is 11/07/2007 (11 July 2007)
- Then before re-run adjustment program, change the setting to 11 July 2007
- Double click the clock in the systray or click Start – Control Panel then select “Date and Time”
- Change the date setting to 11 July 2007 (for Adjustment Epson C90) – apply – Ok
- Now re-run the Adjustment Program, if you do not see error message, you have success running adjustment program.
Available link for download
Free Download Speed Out – Software Pengukur Kecepatan USB Drive
Free Download Speed Out – Software Pengukur Kecepatan USB Drive
Sebagian besar orang membeli Flash Disk bukan dilihat dari kecepatan baca atau tulisnya Flash Disk tetapi dari besar kecilnya size

SpeedOut merupakan program gratis yang dibuat untuk mengetahui kecepatan USB Flashdisk ( temasuk eksternal HDD, USB Stick dll) membaca data dan menulisannya (Reading Speed dan Writing Speed). Reading Speed artinya kecepatan membaca data yang ada di flashdisk, sedangkan Writing Speed artinya kecepatan ketika menulis/copy data ke flashdisk.
Penggunaan Program Speed Out sangat mudah, tinggal memilih drive USB Flashdisk yang ada dan klik tombol Start, otomatis anda akan melihat hasilnya, seperti gambar dibawah ini :
Hasil Scan Flask Disk Transcend Data Traveler 2 GB

Speed Out mempunyai beberapa keunggulan dibanding program sejenis, semisal HDD Tune. Beberapa fitur dan keunggulan program ini yaitu :
Ø Bersifat Portable, hanya satu file exe saja yang langsung dijalankan
Ø Tidak perlu format Flashdisk
Ø Low level technology, yang memungkinkan mengetahui kecepatan nyata dan tidak terpengaruh oleh file sistem.
Ø Desain yang sederhana tetapi cukup menarik dan informative
Ø Penggunaan sangat mudah
Ø Data tidak akan terhapus atau rusak ketika proses testing, baik test kecepatan baca maupun tulis
Untuk mendapatkan Software ini, silahkan anda klik link dibawah ini, dan saya sarankan sobat untuk menggunakan Internet Download Managersupaya downloadnya lebih cepat. Silahkan Klik Disini jika anda belum punya.
Ø Download Speed Out I 1 MB
Catatan :
Kecepatan membaca dan menulis Flash Disk juga tergantung dengan besar RAM dan kecepatan computer anda…
Semoga Bermanfaat..
Available link for download
Hidden Star Wars film in Win XP
Hidden Star Wars film in Win XP

This works in Win XP only:
click Start, Run and type in the following:
telnet towel.blinkenlights.nl
Available link for download
Thursday, September 29, 2016
How to Remove Malware From Your Windows PC
How to Remove Malware From Your Windows PC
Step 1: Enter Safe Mode
Keep your PC disconnected from the Internet, and dont use it until youre ready to clean your PC. This can help prevent the malware from spreading and/or leaking your private data.If you think your PC may have a malware infection, boot your PC into Microsofts Safe Mode. In this mode, only the minimum required programs and services are loaded. If any malware is set to load automatically when Windows starts, entering in this mode may prevent it from doing so.
To boot into Windows Safe Mode, first shut down your PC. Locate the F8 key on your PCs keyboard; turn the PC on; and as soon as you see anything on the screen, press the F8 key repeatedly. This should bring up the Advanced Boot Options menu; there, select Safe Mode with Networking and press Enter.
You may find that your PC runs noticeably faster in Safe Mode. This could be a sign that your system has a malware infection, or it could mean that you have a lot of legitimate programs that normally start up alongside Windows.
Step 2: Delete Temporary Files
Now that youre in Safe Mode, youll want to run a virus scan. But before you do that, delete your temporary files. Doing this may speed up the virus scanning, free up disk space, and even get rid of some malware. To use the Disk Cleanup utility included with Windows, select Start, All Programs (or just Programs), Accessories, System Tools, Disk Cleanup.Step 3: Download Malware Scanners
Now youre ready to have a malware scanner do its work--and fortunately, running a scanner is enough to remove most infections. If you already had an antivirus program active on your computer, you should use a different scanner for this malware check, since your current antivirus software may have not detected the malware. Remember, no antivirus program can detect 100 percent of the millions of malware types and variants.
There are two types of antivirus programs. Youre probably more familiar with real-time antivirus programs, which constantly watch for malware. Another option is on-demand scanners, which search for malware infections when you open the program manually and run a scan. You should have only one real-time antivirus program installed at a time, but you can keep a few on-demand scanners handy to run scans with multiple programs, thereby ensuring that youre covered.
If you think your PC is infected, I recommend using an on-demand scanner first and then following up with a full scan by your real-time antivirus program. Among the free (and high-quality) on-demand scanners available are BitDefender Free Edition, Kaspersky Virus Removal Tool, Malwarebytes, Norman Malware Cleaner, and SuperAntiSpyware.
Step 4: Run a Scan With Malwarebytes
For illustrative purposes, Ill describe how to use the Malwarebytes on-demand scanner. To get started, download it. If you disconnected from the Internet for safety reasons when you first suspected that you might be infected, reconnect to it so you can download, install, and update Malwarebytes; then disconnect from the Internet again before you start the actual scanning. If you cant access the Internet or you cant download Malwarebytes on the infected computer, download it on another computer, save it to a USB flash drive, and take the flash drive to the infected computer.
After downloading Malwarebytes, run the setup file and follow the wizard to install the program. Once installed, Malwarebytes will check for updates and launch the app itself. If you get a message about the database being outdated, select Yes to download the updates and then click OK when prompted that they have been successfully installed.
Once the program opens, keep the default scan option (Perform quick scan) selected and click the Scan button.
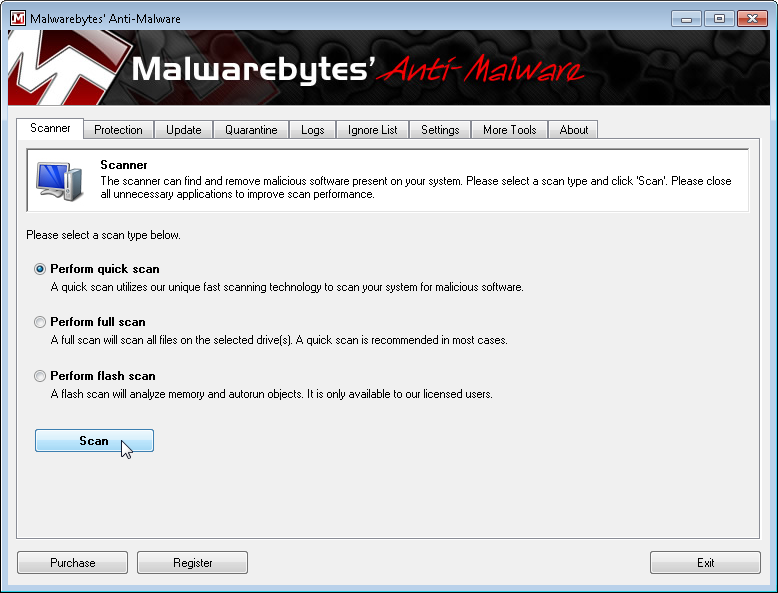
Though it offers a full-scan option, Malwarebytes recommends that you perform the quick scan first, as that scan usually finds all of the infections anyway. Depending on your computer, the quick scan can take anywhere from 5 to 20 minutes, whereas the full scan might take 30 to 60 minutes or more. While Malwarebytes is scanning, you can see how many files or objects the software has already scanned, and how many of those files it has identified either as being malware or as being infected by malware.
If Malwarebytes automatically disappears after it begins scanning and wont reopen, you probably have a rootkit or other deep infection that automatically kills scanners to prevent them from removing it. Though you can try some tricks to get around this malicious technique, you might be better off reinstalling Windows after backing up your files (as discussed later), in view of the time and effort you may have to expend to beat the malware.
If Malwarebytes quick scan doesnt find any infections, it will show you a text file containing the scan results. If you still think that your system may have acquired some malware, consider running a full scan with Malwarebytes and trying the other scanners mentioned earlier. If Malwarebytes does find infections, itll bring up a dialog box warning you of the discovery. To see what suspect files the scanner detected, click the Scan Results button in the lower right. It automatically selects to remove the ones that are known to be dangerous. If you want to remove other detected items, select them as well. Then click the Remove Selected button in the lower left to get rid of the specified infections.
Removing infections in Malwarebytes.
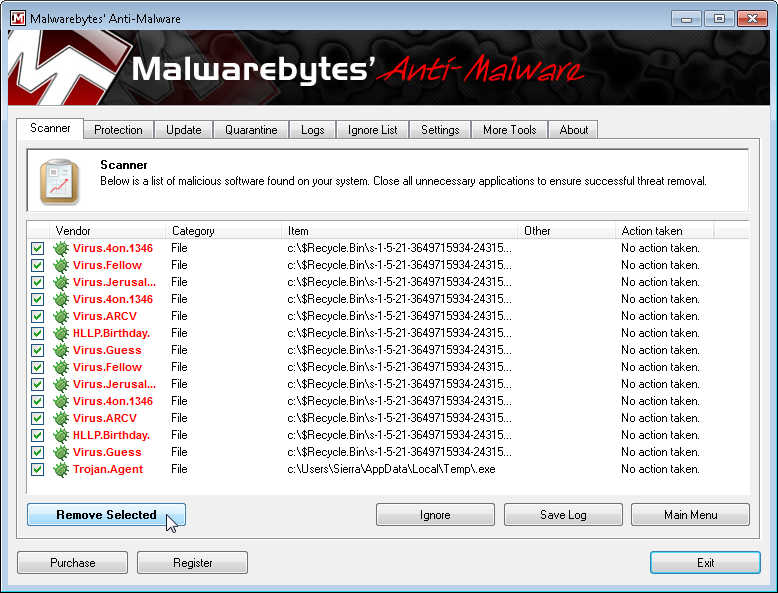
After removing the infections, Malwarebytes will open a text file listing the scan and removal results; skim through these results to confirm that the antivirus program successfully removed each item. Malwarebytes may also prompt you to restart your PC in order to complete the removal process, which you should do.
If your problems persist after youve run the quick scan and it has found and removed unwanted files, consider running a full scan with Malwarebytes and the other scanners mentioned earlier. If the malware appears to be gone, run a full scan with your real-time antivirus program to confirm that result.
Available link for download
Epson L350 Driver Download
Epson L350 Driver Download
Epson L350 Driver Download
 |
Epson L350 Driver Download |
PrinterCloud : Support Driver Printers Review Epson L350 is one of the newest of the products featured printer epson printer that offers many functions including printing and copying and scan your documents. This printer can print up to 9 ipm speed and can print up to 30,000 pages. besides designed for business printing, this printer is also suitable for students.
Another advantage offered by Epson L350 Driver Download is having excess with other printers that have 2 pieces of black ink reservoir with a capacity of up to 70 ml. with a rather large capacity can print up to 4 thousand pages for black and white mode. and 3 pieces of color ink reservoir with a capacity of 70 ml can print 6500 pages for color mode.
Support Driver Epson L Series
You can find the latest printer driver on the site driverboss.com. You can also download the printer driver on the link that has been PrinterCloud | Support Driver Printers | Support Epson L Series| http://www.supportdriverprinters.com. very easily without transferable to another link, do not forget to choose the link that corresponds to your computer’s operating system. For the sake of continuity and development of this website do not forget to provide feedback, criticism and suggestions.
To use the Epson L350 Driver Download then you must first install the drivers you because it is suitable for use with an operating system:
Windows 8.1
Windows 8
Windows 7
Windows Vista
Windows XP
Mac Os X
Mac
But for the more obvious types of drivers available, you can see the available downloads linked below. To my friend who wants to install drivers, please follow the installation method below:
Make sure buddy has had a driver, if not please download at the link below
Please in check and make sure the computer is connected to the printer data
cable
cable
Make sure the printer is on
Make sure the computer is turned on
Open the installation file and double-tap
Click Next
and Next
and Next
completed
Epson L350 Driver Download For Windows 32-bit
Driver
|
Download
|
Windows 8, Windows 8.1
|
Download
|
Windows 7, Windows XP, Windows Vista
|
Download
|
Epson L350 Driver Download For Windows 64-bit
Driver
|
Download
|
Windows 8, Windows 8.1
|
Download
|
Windows 7, Windows XP, Windows Vista
|
Download
|
Epson L350 Driver Download For Mac and Linux
Driver
|
Download
|
Mac OS X 10.8, Mac OS X 10.9 Mac OS X 10.5, Mac OS X 10.6, Mac OS X 10.7
|
Download
|
Linux
|
Download
|
Epson L350 Driver Download
Searches related to Epson L350 Driver Download
epson l350 driver for windows 10
epson l350 printer driver for windows 7 64 bit
epson l350 resetter
epson l350 driver for windows 8 64 bit
epson l350 harga
epson l350 scanner driver for windows 7 32 bit
epson l350 review
epson l350 driver malaysia
Available link for download
Subscribe to:
Posts (Atom)