Showing posts with label remove. Show all posts
Showing posts with label remove. Show all posts
Thursday, February 9, 2017
How to Remove Fake Antivirus
How to Remove Fake Antivirus

Remove Fake Antivirus or RFA is a free tools used to remove the most popular Rogue antiviruses. Rogue AV is a type of virus/malwares which disguises itself to be an antivirus. It infects your computer when you accidentally click a link in a website which will download the malware into your computer and run automatically when your windows boot. It scan the infected computer and produces fake alert warnings. It convinces you that your computer is in danger and urge you to purchase a copy of the fake antivirus.
Heres a list of Rogue AV that can remove by RFA (Remove Fake Antivirus v1.69)
- Additional Guard
- Alpha Antivirus
- Antivir 2010
- Antivirus 2009
- Antivirus 2010
- Antivirus 360
- Antivirus 7
- Antivirus 8
- Antivirus BEST
- Antivirus GT
- Antivirus Live
- Antivirus Pro 2009
- Antivirus Pro 2010
- Antivirus Soft
- Antivirus Suite
- Antivirus System Pro
- Anti-Virus-1
- Braviax
- CleanUp Antivirus
- Control Center
- Cyber Security
- Defense Center
- Desktop Defender 2010
- Digital Protection
- FraudTool.MalwareProtector.d
- Green AV
- IGuardPC or I Guard PC
- Internet Security 2010
- Live PC Care
- Malware Defense
- Malware Doctor
- MS Antispyware 2009
- My Security Shield
- PC Antispyware 2010
- Personal Antivirus
- Personal Security
- Protection Center
- Security Antivirus
- Security Center
- Security Central
- Security Master AV
- Security Tool
- Security Toolbar
- Spyware Guard 2008
- Sysinternals Antivirus
- System Guard 2009
- System Security
- System Security 2009
- Total PC Defender 2010
- Total Security 2009
- Total XP Security
- Vista Antivirus Pro 2010
- Vista Guardian 2010
- Vista Internet Security 2010
- Vista Security Tool 2010
- Windows Enterprise Suite
- Windows Police Pro
- Windows Protection Suite
- Windows System Suite
- WinPC Defender
- Winshield2009.com
- XP Guardian
- XP Internet Security 2010
- XP Smart Security 2010
- Your PC Protector
Download
If this doesnt solve your problem try to this solution then scan with Kaspersky Virus Removal Tools.
If this doesnt solve your problem try to this solution then scan with Kaspersky Virus Removal Tools.
Available link for download
Friday, December 30, 2016
How to Remove You may be a victim of software counterfeiting
How to Remove You may be a victim of software counterfeiting

OK, heres a two methods to fix this problem.
Method 1: The Long cut!
1. Launch Windows Task Manager. (by pressing Ctrl+Alt+Del keys)
2. Locate the process “WgaTray.exe” and press end task.
3. then restart your pc and Log-in into the Safe Mode by Press F8 before windows boots) and delete the file WgaTray.exe from c:WindowsSystem32
4. Delete also WgaTray.exe from c:WindowsSystem32dllcache
5. then Type regedit in Run (Win+R) to open Registry Editor, navigate to
HKEY_LOCAL_MACHINESOFTWAREMicrosoftWindows NTCurrentVersionWinlogonNotify key6. then Delete the folder WgaLogon and all of its contents.
7. After that Restart the PC normally. and Its done!
Method 2: The shortcut
Just download and run RemoveWGA.exe
and its done!
Download
Available link for download
Tuesday, December 27, 2016
How to Remove Scratches From Any DVD CD
How to Remove Scratches From Any DVD CD
Masalah yang sering terjadi kepada kita seharian. Jadi, apa tindakan kita ? Maslah CD/DVD calar sering menghantui kalau kita tak jaga elok2. Kena plak DVD / CD yang paling kita sayang atau yang mahal. So, disini kami tunjukkan video bagaimana nak hilangkan calar pada CD/DVD supaya tak tersekat semasa kita mainakan ia. Saksikan video dibawah ini.
Available link for download
Monday, December 12, 2016
How to remove a program icon from the Start menu windows 7
How to remove a program icon from the Start menu windows 7
To remove a program icon from the Start menu
Available link for download
Friday, December 2, 2016
How to remove HDD user password in Acer laptops
How to remove HDD user password in Acer laptops
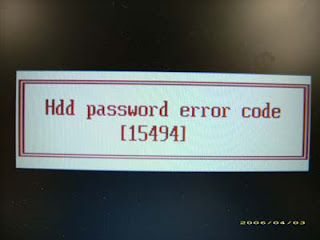
This article provides you with details about removing HDD/BIOS user password. If you key in the wrong HDD password three times, an error code is generated like the one in the picture below.
To reset the HDD user password, perform the following steps:
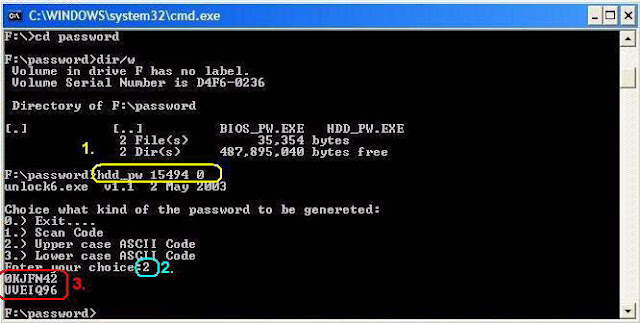
- On a different machine, run the HDD_PW.EXE file along with the error code generated. For example:
hdd_pw 15494 0
- Select an option to generate upper case or lower case ASCII code for unlocking the HDD.
- Two strings are generated as output. Select and note down either one of the strings.
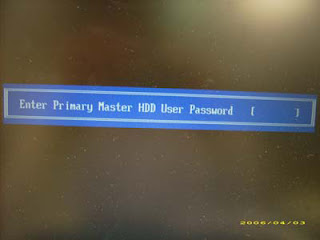
4. Reboot the machine with the locked HDD and then use either one of the strings as the HDD user
password.
Download Link
Available link for download
Thursday, November 17, 2016
How to remove Windows XP Splash screen during boot up
How to remove Windows XP Splash screen during boot up

Do you ever wonder what is happening behind Windows splash screen during boot up? or Are you having boot up problems and would like to know what it going on behind that Windows Loading Logo? To find out, you can disable the splash screen by making a small change to the Boot.ini file.
Follow these steps carefully!
1. Right click "My Computer" Then select "Properties"
2. On the Advanced tab, click the Settings button in the "Startup And Recovery" section.
3. In the "Startup And Recovery" dialog box, select the Edit button in the "System Startup" section.
4. The Boot.ini file will open in Notepad; locate the line that ends with the /fastdetect switch and replace with /SOS switch (/fastdetect switch only).
6. Save the Boot.ini file, and close Notepad.
7. Click Cancel to close both the "Startup And Recovery" dialog box and the "System Properties" dialog box.
8. Restart the computer to see the effect.
Once the computer restarts you will notice that the Windows Splash Screen is no longer present. Instead you can observe some of the boot up operations that Windows XP performs during the startup stage.
To renable the splash screen, follow the same procedure but replace the /SOS switch with /fastdetect
Available link for download
Tuesday, November 8, 2016
How to remove PDF restriction
How to remove PDF restriction

Did you recently download a PDF files with restriction such as printing, copying text, etc. Do you wish to remove its restrictions?
You can easily remove PDF restrictions with FreeMyPDF.com. FreeMyPDF is a website that can remove printing, copying, editing restrictions from PDF files. FreeMyPDF is free and doesn’t required to sign-ups.
Just upload PDF files to FreeMyPDF.com and click Do it button, after a while PDF file restrictions will be removed and you will get a download dialog box. then save the unlocked PDF to your PC.
Note that this only works for PDFs that you can open and read without any 3rd party plugins. PDFs that require a password to be viewed cannot be unlocked by this service. This is because this is not cracking. Viewable PDFs with restrictions are not really protected, no more than a door with a broken lock, as opposed to password-protected PDFs.
Available link for download
Friday, October 28, 2016
How to remove Deep Freeze without Password Cara Mematikan Deep Freeze Tanpa Password
How to remove Deep Freeze without Password Cara Mematikan Deep Freeze Tanpa Password
Bagaimana Cara Menempel (Embed) file PHP kedalam Blogspot ?
- Untuk melakukannya, anda harus sudah membuat dan meng-upload file PHP ke hosting yang mensupport PHP.
- Login ke Blogger anda.
- Kemudian copy kode dibawah ini kedalam postingan, template ataupun widget anda :
<objectwidth="500"height="350"type="text/html"data="http://your.domain.com/nama-file.php"></object>- Aturlah width dan height sesuai dengan yang anda inginkan.
- Simpanlah pekerjaan anda.
Available link for download
Wednesday, October 19, 2016
How to Remove Bios Password for Acer Laptops
How to Remove Bios Password for Acer Laptops

If you key in the wrong Supervisor password three times, an error code is generated and system is disabled like in the image below.

To unlock the BIOS, perform the following steps:
1. On a different machine, run the BIOS_PW.EXE file along with the error code generated. For example:
bios_pw 14452 02. Four ASCII strings are generated as output. Select and note down any one of the strings.

3. Reboot the machine with the locked BIOS and then use either any of the strings as the BIOS user
password.

Download link
Available link for download
Thursday, September 29, 2016
How to Remove Malware From Your Windows PC
How to Remove Malware From Your Windows PC

Step 1: Enter Safe Mode
Keep your PC disconnected from the Internet, and dont use it until youre ready to clean your PC. This can help prevent the malware from spreading and/or leaking your private data.If you think your PC may have a malware infection, boot your PC into Microsofts Safe Mode. In this mode, only the minimum required programs and services are loaded. If any malware is set to load automatically when Windows starts, entering in this mode may prevent it from doing so.
To boot into Windows Safe Mode, first shut down your PC. Locate the F8 key on your PCs keyboard; turn the PC on; and as soon as you see anything on the screen, press the F8 key repeatedly. This should bring up the Advanced Boot Options menu; there, select Safe Mode with Networking and press Enter.
You may find that your PC runs noticeably faster in Safe Mode. This could be a sign that your system has a malware infection, or it could mean that you have a lot of legitimate programs that normally start up alongside Windows.
Step 2: Delete Temporary Files
Now that youre in Safe Mode, youll want to run a virus scan. But before you do that, delete your temporary files. Doing this may speed up the virus scanning, free up disk space, and even get rid of some malware. To use the Disk Cleanup utility included with Windows, select Start, All Programs (or just Programs), Accessories, System Tools, Disk Cleanup.Step 3: Download Malware Scanners
Now youre ready to have a malware scanner do its work--and fortunately, running a scanner is enough to remove most infections. If you already had an antivirus program active on your computer, you should use a different scanner for this malware check, since your current antivirus software may have not detected the malware. Remember, no antivirus program can detect 100 percent of the millions of malware types and variants.
There are two types of antivirus programs. Youre probably more familiar with real-time antivirus programs, which constantly watch for malware. Another option is on-demand scanners, which search for malware infections when you open the program manually and run a scan. You should have only one real-time antivirus program installed at a time, but you can keep a few on-demand scanners handy to run scans with multiple programs, thereby ensuring that youre covered.
If you think your PC is infected, I recommend using an on-demand scanner first and then following up with a full scan by your real-time antivirus program. Among the free (and high-quality) on-demand scanners available are BitDefender Free Edition, Kaspersky Virus Removal Tool, Malwarebytes, Norman Malware Cleaner, and SuperAntiSpyware.
Step 4: Run a Scan With Malwarebytes
For illustrative purposes, Ill describe how to use the Malwarebytes on-demand scanner. To get started, download it. If you disconnected from the Internet for safety reasons when you first suspected that you might be infected, reconnect to it so you can download, install, and update Malwarebytes; then disconnect from the Internet again before you start the actual scanning. If you cant access the Internet or you cant download Malwarebytes on the infected computer, download it on another computer, save it to a USB flash drive, and take the flash drive to the infected computer.
After downloading Malwarebytes, run the setup file and follow the wizard to install the program. Once installed, Malwarebytes will check for updates and launch the app itself. If you get a message about the database being outdated, select Yes to download the updates and then click OK when prompted that they have been successfully installed.
Once the program opens, keep the default scan option (Perform quick scan) selected and click the Scan button.

Though it offers a full-scan option, Malwarebytes recommends that you perform the quick scan first, as that scan usually finds all of the infections anyway. Depending on your computer, the quick scan can take anywhere from 5 to 20 minutes, whereas the full scan might take 30 to 60 minutes or more. While Malwarebytes is scanning, you can see how many files or objects the software has already scanned, and how many of those files it has identified either as being malware or as being infected by malware.
If Malwarebytes automatically disappears after it begins scanning and wont reopen, you probably have a rootkit or other deep infection that automatically kills scanners to prevent them from removing it. Though you can try some tricks to get around this malicious technique, you might be better off reinstalling Windows after backing up your files (as discussed later), in view of the time and effort you may have to expend to beat the malware.
If Malwarebytes quick scan doesnt find any infections, it will show you a text file containing the scan results. If you still think that your system may have acquired some malware, consider running a full scan with Malwarebytes and trying the other scanners mentioned earlier. If Malwarebytes does find infections, itll bring up a dialog box warning you of the discovery. To see what suspect files the scanner detected, click the Scan Results button in the lower right. It automatically selects to remove the ones that are known to be dangerous. If you want to remove other detected items, select them as well. Then click the Remove Selected button in the lower left to get rid of the specified infections.
Removing infections in Malwarebytes.

After removing the infections, Malwarebytes will open a text file listing the scan and removal results; skim through these results to confirm that the antivirus program successfully removed each item. Malwarebytes may also prompt you to restart your PC in order to complete the removal process, which you should do.
If your problems persist after youve run the quick scan and it has found and removed unwanted files, consider running a full scan with Malwarebytes and the other scanners mentioned earlier. If the malware appears to be gone, run a full scan with your real-time antivirus program to confirm that result.
Available link for download
Subscribe to:
Posts (Atom)